
This post is part of the Game Development with DragonRuby series
- 1An Introduction to Game Development with DragonRuby
- 2Completing, Integrating, and Publishing Our Game with DragonRuby
The DragonRuby Game Toolkit is a powerful, cross-platform 2D game engine that allows you to create fun game titles while staying in your favorite developer-friendly language. What's not to love?
In this post, we are going to cover the basics of game development with DragonRuby. We will use a "Flappy Bird" clone to explain the fundamental concepts.
But before we get started, let's address two initial concerns you might have about DragonRuby right off the bat.
Initial Concerns
First of all, DragonRuby is not free. Yes, that's correct, it costs money — at the time of writing, the standard license is a one-time purchase of $48. Given that you get a state-of-the-art 2D graphics engine boxed with integrated publishing/exporting to itch.io and Steam, in my opinion this is more than justified. In addition, there are semi-regular discounts at special occasions like Ruby or gaming conferences and conventions, so watch out for these!
Second, you might have heard that Ruby is "slow". While we can probably agree that this is a relative term in general, it is even more fuzzy in this case. Typically when referring to "Ruby" we mean the CRuby interpreter, which is what you most likely run on the machines that serve your Rails apps. DragonRuby is a whole different runtime though, based on mruby (that is, with an intentionally smaller subset of functionality, but optimized for game development). We'll take a closer look later in this article, but the DragonRuby docs have some videos comparing its performance to other game engines.
Check out DragonRuby's docs page about their overall philosophy and goals.
First Steps: Game Development with DragonRuby
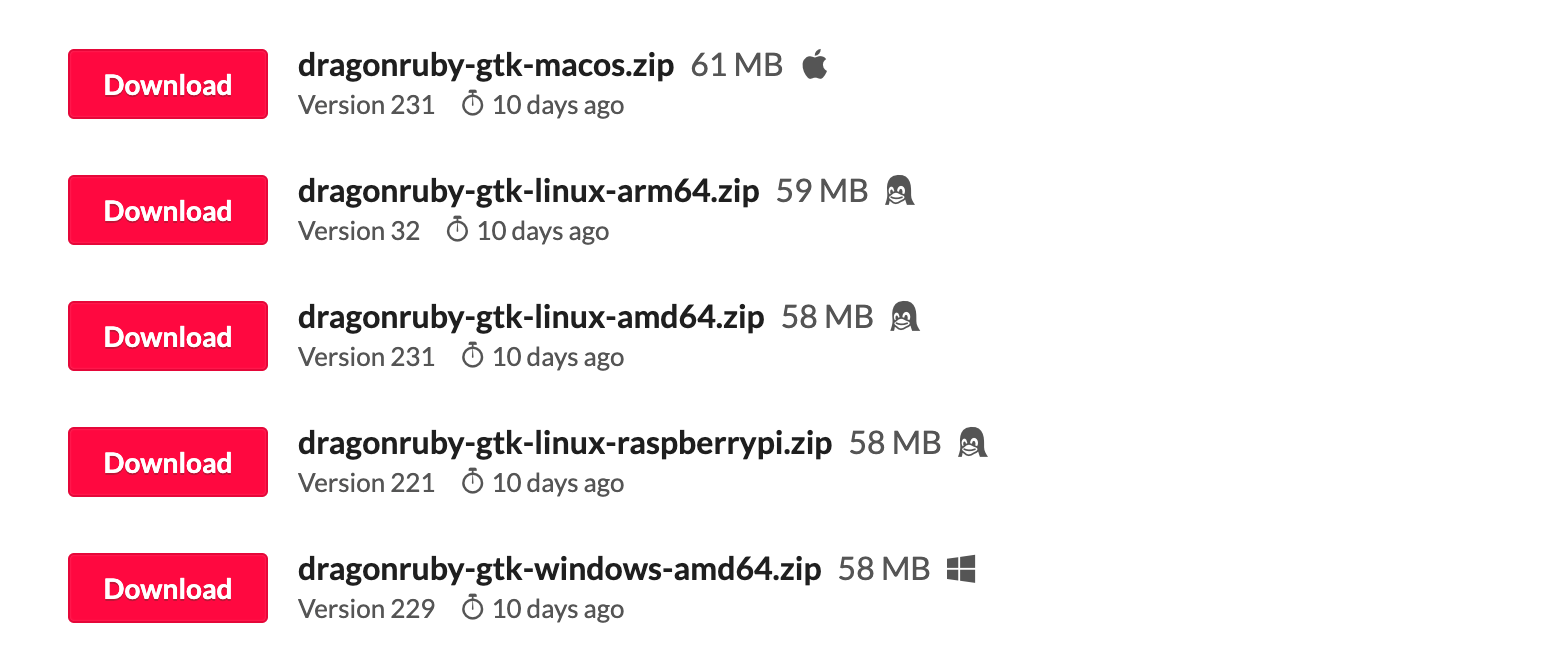
To start out developing a game, download it from the DragonRuby Game Toolkit after you've purchased a standard license. Make sure you select the correct download according to your platform:
Once you unpack the zip file, this is the resulting directory structure:
$ ll
CHANGELOG-CURR.txt
CHANGELOG-PREV.txt
console-logo.png
ctags-emacs
ctags-vim
docs/
dragonruby*
dragonruby-controller.png
dragonruby-httpd*
dragonruby-publish*
dragonruby.png
eula.txt
font.ttf
mygame/
open-source-licenses.txt
README.txt
samples/
VERSION.txt
All you need to get started is the dragonruby executable and the mygame folder, which contains the game logic. Here's a general best practice that might sound counterintuitive at first, but it actually makes great sense: Do not keep this folder in a shared location and refer to it when developing a new game, as this will set you up for trouble.
Instead, always download a fresh copy of the GTK and use the predefined structure. What might seem wasteful actually makes sense, because the moment you package and ship your game, the dragonruby-publish executable expects files to be in certain paths and you'll have to deal with a lot of confusing issues if you rename them. So, even though you might have thought up that very catchy title for your game, it's fine to leave the folder name mygame and just set the game name in the metadata. We'll talk about that later.
If you're curious about the limits of DragonRuby and what functionality and interfacing it provides, check out the samples folder. It contains an abundance of examples and even whole games of different genres.
To round off this section, let's review how DragonRuby interfaces with MRuby, graphics rendering, and hardware I/O. It employs a layered approach where it encapsulates MRuby at the lowest layer, then adds optimizations for its cross-platform targets and the Simple DirectMedia Layer library, with Ruby bindings to get consistent access to low-level resources. The DragonRuby docs have more context on this matter.
A further surprise for a seasoned Ruby developer is that there is no concept of "gems". This is another trait it inherits from MRuby. In fact, there are many third-party libraries, but they are not included via a Gemfile and managed by Bundler. Instead, it's a more manual process requiring you to either clone git repositories manually (e.g., under mygame/lib), or use the built-in download_stb_rb function to download and require external code.
Getting Started with DragonRuby Development
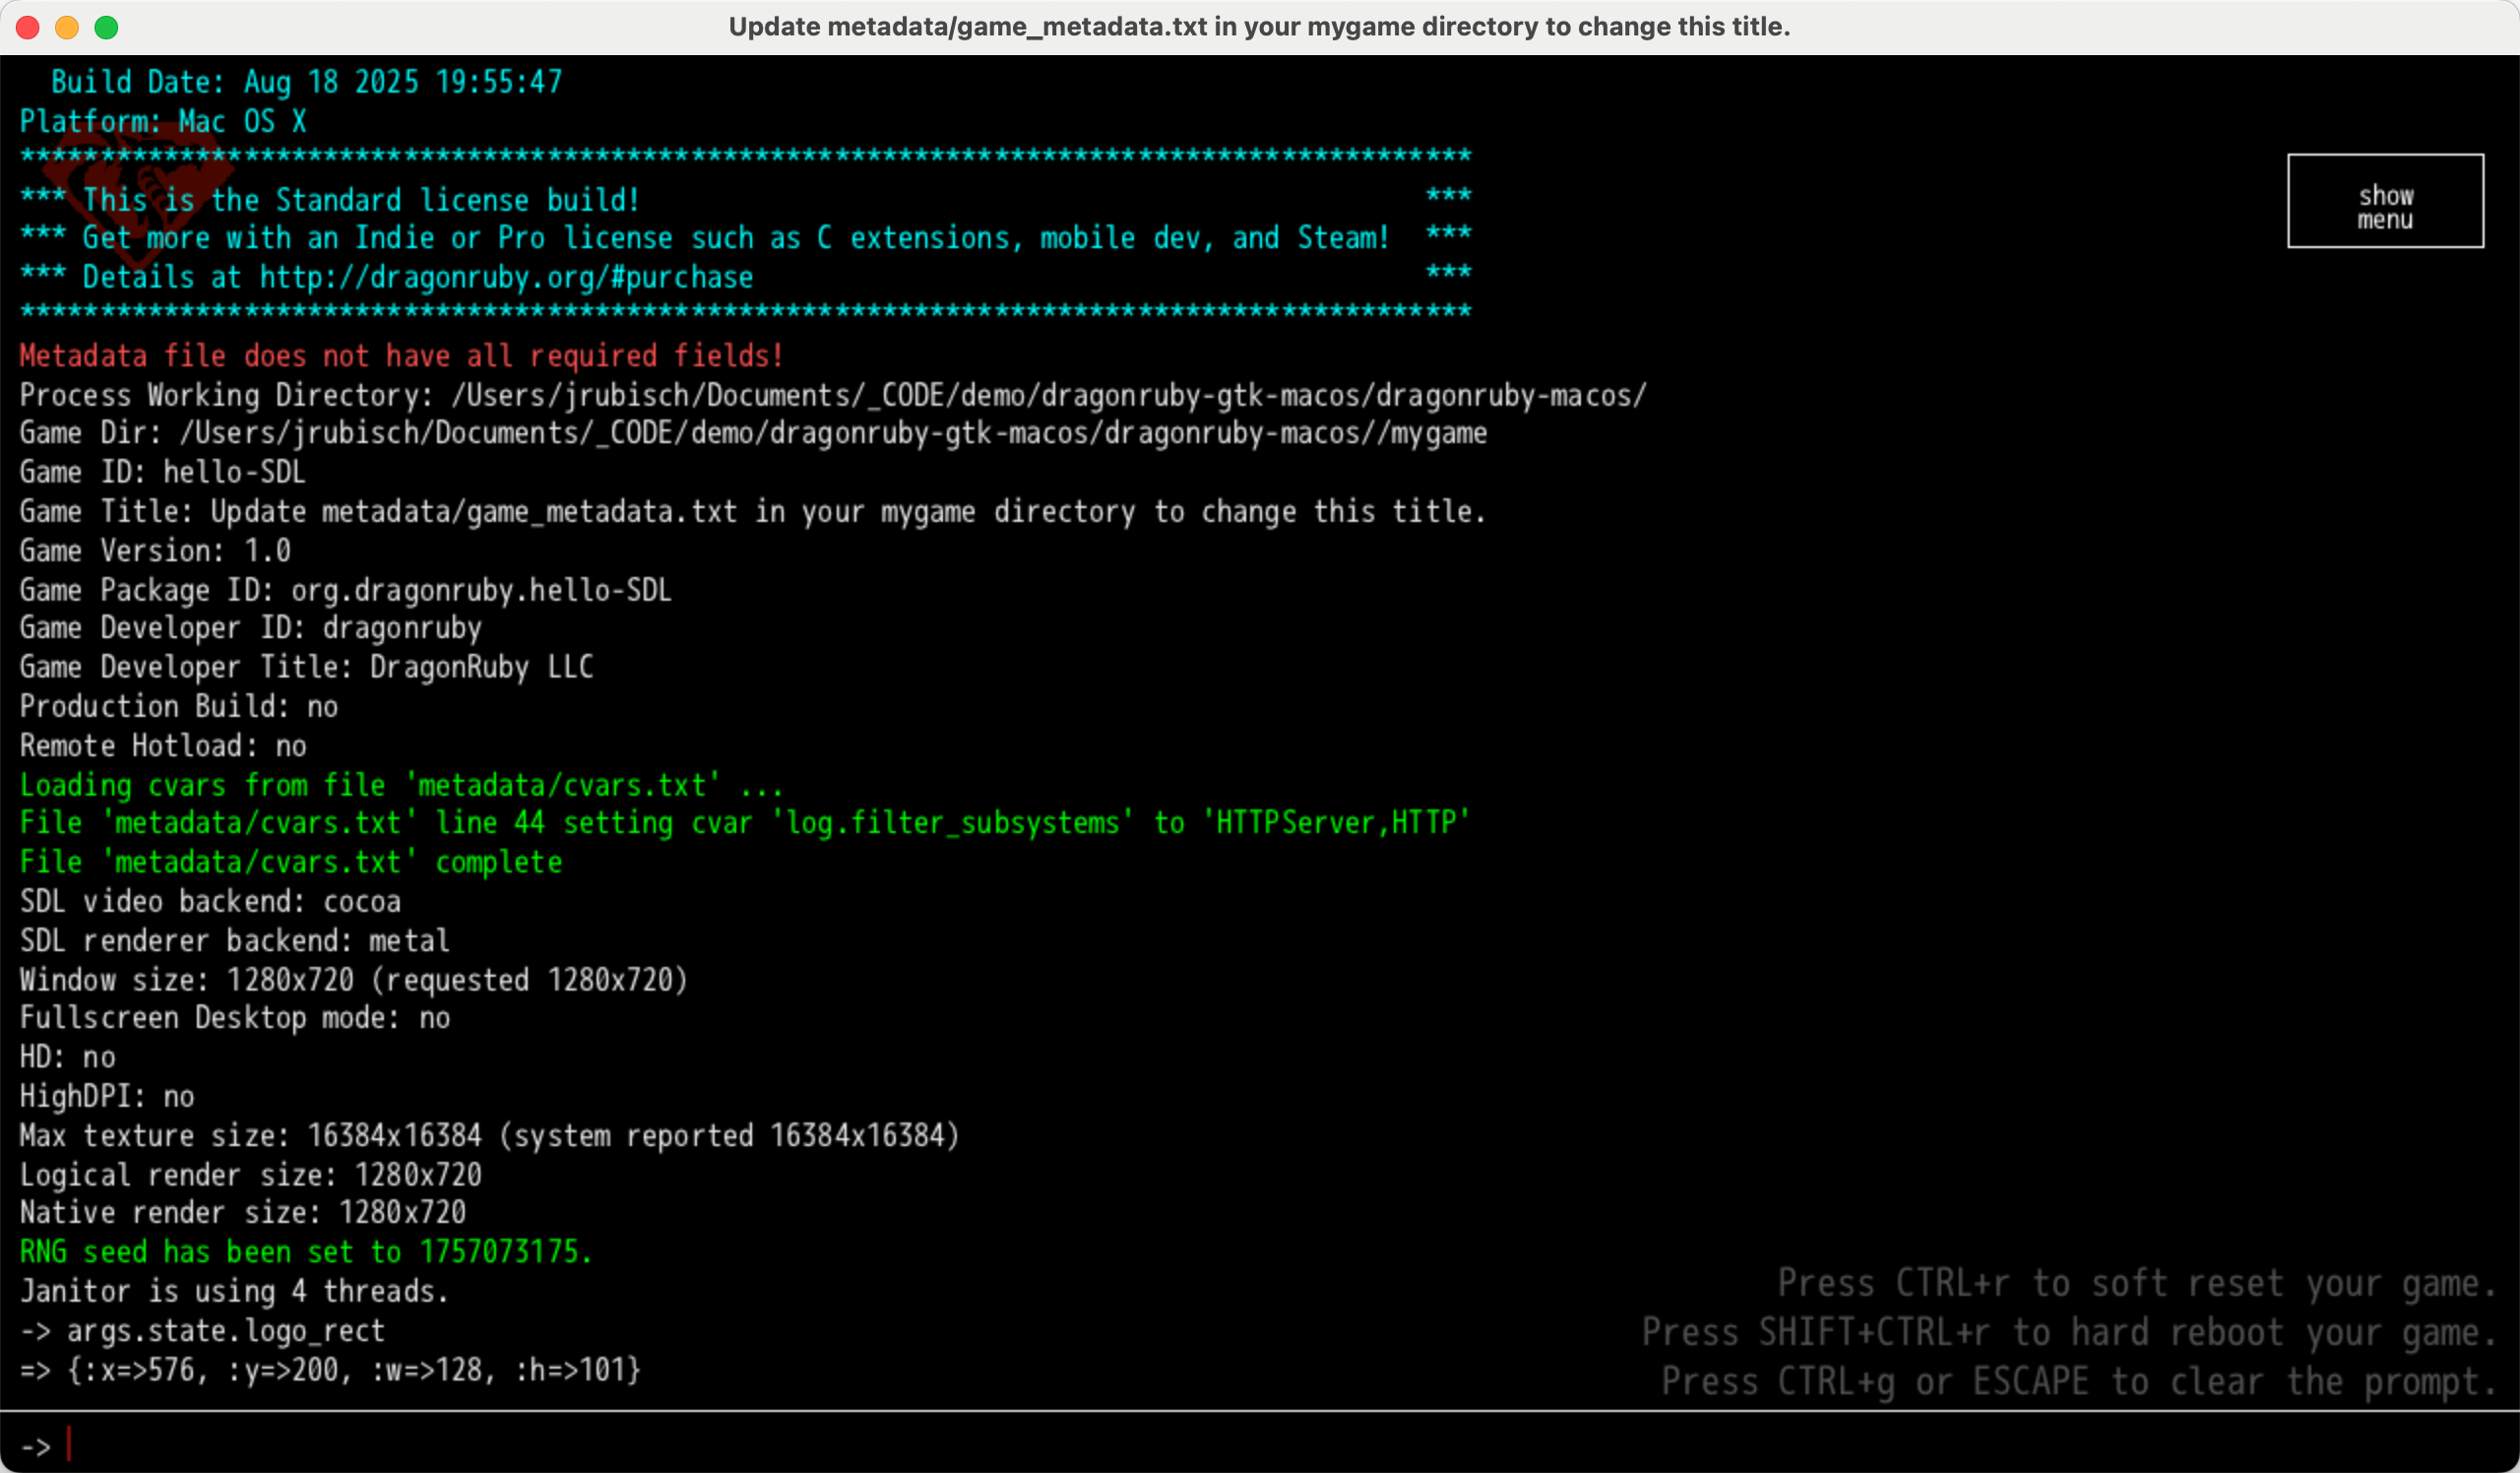
Now let's take our first look at the game. For this, just start the dragonruby executable from a terminal:
$ ./dragonruby
* [Engine] Log started at 2025/8/29 10:26:32
* [Engine] DragonRuby Game Toolkit
* [Engine]   Version: 6.30
* [Engine]   Tier: Standard
* [Engine]   GIT Hash: 4fe7c8c45b2fef5c393a91b5f128c490aa5529ca
* [Engine]   Build Date: Aug 18 2025 19:55:47
* [Engine] Platform: Mac OS X
- [Engine] Process Working Directory: /Users/jrubisch/Documents/_CODE/demo/dragonruby-gtk-macos/dragonruby-macos/
- [Engine] Game Dir: /Users/jrubisch/Documents/_CODE/demo/dragonruby-gtk-macos/dragonruby-macos//mygame
- [Engine] Game ID: hello-SDL
- [Engine] Game Title: Update metadata/game_metadata.txt in your mygame directory to change this title.
- [Engine] Game Version: 1.0
- [Engine] Game Package ID: org.dragonruby.hello-SDL
- [Engine] Game Developer ID: dragonruby
- [Engine] Game Developer Title: DragonRuby LLC
I've shortened the log output a bit to highlight the most salient information: the GTK version and platform, information about our game directory, and metadata. More interestingly, though, a window appears with some educational copy and animation:
The Anatomy of a DragonRuby Game
Let's examine this starter demo to get a grasp of the basic building blocks of a DragonRuby game. For this, let's open mygame/main.rb.
def tick args
  args.state.logo_rect ||= { x: 576,
                             y: 200,
                             w: 128,
                             h: 101 }

  args.outputs.labels  << { x: 640,
                            y: 600,
                            text: 'Hello World!',
                            size_px: 30,
                            anchor_x: 0.5,
                            anchor_y: 0.5 }

  ## ... more args wrangling
end
Right off the bat, two things stand out that tell us we're in a whole different Ruby world here:
- There's no Ruby class defined. There's not even a
mainmethod. Instead, all we get is thistickmethod. argsseems to be something like a god object.
On a very high level, you can imagine the DragonRuby framework as an infinite loop which calls this tick method 60 times a second — we call this the game loop. Everything you want your game to do has to happen here. The args object is a structure that wraps a good part of the whole DragonRuby API, along with the game state (sprite positions, scores, etc.). Mainly, it covers:
- I/O (video, sound, controllers)
- Event handling
- Capturing and managing game state
We can observe some of this happening here already: args.state is something akin to an OpenStruct where you can add, reference, and modify keys as you go. In this case, we initialize the logo_rect key with screen coordinates and dimensions (x, y, w, h). Note that this key is completely arbitrary. We have to use the conditional assignment operator (||=) here, because, remember, this method is called repeatedly, and we only want to set it in the first iteration.
Next, we append (<<) a hash to args.outputs.labels. You can probably guess that this is what draws "Hello World" to the screen at the specified position.
Drawing and Animating Sprites
A bit further below we find this snippet:
args.outputs.sprites << { x: args.state.logo_rect.x,
                          y: args.state.logo_rect.y,
                          w: args.state.logo_rect.w,
                          h: args.state.logo_rect.h,
                          path: 'dragonruby.png',
                          angle: Kernel.tick_count }
Without exaggeration, this type of interaction is the heart of every 2D computer game. You see, drawing primitives such as lines, points, or rectangles programmatically is far too computationally expensive to do in these 16.67 milliseconds of a game tick. At least as the count of elements in your game starts to grow, you will quickly reach an upper limit of what's possible. That's why pre-drawn graphics known as sprites have been used for this purpose since the invention of video games.
Here, we encounter the simplest case: Just opening an image file (in this case dragonruby.png in the root directory) and rendering it at a specific location with specific dimensions.
This example even goes a bit further by animating it. Notice the Kernel.tick_count method? It reports how many ticks have passed since you started the game, and this will increment by 1 — in every tick, of course. That's why we can use it to rotate our sprite by assigning it to angle.
If you think that you are limited by this technique, you are mistaken: You can go a long way by cleverly organizing and animating your sprites, as we will see later on.
The sprite is positioned at the location designated by args.state.logo_rect. When you are developing a game, it can come in handy to inspect the contents of the state structure. That's where the DragonRuby Console comes into play. While running your game, press ` (the backtick key), and key in args.state.logo_rect.
Here, you can inspect and even interact with your game very conveniently.
Checking Inputs and Updating Game State
While the demo game is open, press some arrow keys. You will notice that the rotating logo starts moving:
You can find the reason for this in the bottom part of the game:
if args.inputs.keyboard.left
  args.state.logo_rect.x -= 10
elsif args.inputs.keyboard.right
  args.state.logo_rect.x += 10
end

if args.inputs.keyboard.down
  args.state.logo_rect.y -= 10
elsif args.inputs.keyboard.up
  args.state.logo_rect.y += 10
end
We can use args.inputs.keyboard to check whether a certain key has been pressed in the current game tick. left, right, up, down are convenience methods that return true or false depending on the state of the respective arrow keys.
When they are pressed, we update the coordinates of args.state.logo_rect. In the following game tick, this new position will be used to draw the logo sprite, and we've come full circle.
Example Game: A Flappy Bird Clone
To further deepen our understanding of game development, let's build an exciting example game — a ... 🥁 ... Flappy Bird clone.
The first and maybe all too obvious question is: where do we get our sprite images from? In the age of generative AI, the most straightforward answer would probably be to have your favorite chat agent create them. If you're more classically inclined and want to support other indie creators, a safe place to grab some quality assets is Kenney.
As it turns out, they have a pack called Tappy Plane, which contains precisely what we need:
- a character (a plane)
- obstacles (rocks)
- an unobtrusive background
Copy all the sprites into mygame/sprites and we're ready to get going.
Draw and Animate the Background
First, we are going to draw the background, which is just a static sprite. Remove everything inside the tick method and replace it with a simple array concatenation:
def tick args
  args.outputs.sprites << { x: 0, y: 0, w: 1280, h: 720, path: "sprites/background.png" }
endIf you now run dragonruby from the root directory, you'll see the background painted on the canvas.
Now it'd be nice to add some movement to the scene by animating and looping the background.
To achieve this, we just have to adjust our rendering logic a little bit:
def tick args
  args.outputs.sprites << { x: 0 - Kernel.tick_count % 1280, y: 0, w: 1280, h: 720, path: "sprites/background.png" }
  args.outputs.sprites << { x: 1280 - Kernel.tick_count % 1280, y: 0, w: 1280, h: 720, path: "sprites/background.png" }
end
As you can see, the first change is that we are now rendering the same sprite twice, albeit with an x offset (the game width — 1280). Then, we use Kernel.tick_count to access how many ticks have passed since the game started, and use it to move the x position to the left and subtract it. The result looks like this:
Rendering the Player Sprite
Next, we'll draw the plane. Before we do that, though, we'll instantiate its position in args.state like in the example above. This way, it will "survive" ticks and we can modify the y coordinate by applying gravity and jumping. Once that is done, we can use this position and the sprite image's path to actually display it.
  def tick args
+   args.state.plane_pos ||= { x: 640,
+                              y: 360,
+                              w: 88,
+                              h: 73,
+                              anchor_x: 0.5,
+                              anchor_y: 0.5 }

    args.outputs.sprites << { x: 0 - Kernel.tick_count % 1280, y: 0, w: 1280, h: 720, path: "sprites/background.png" }
    args.outputs.sprites << { x: 1280 - Kernel.tick_count % 1280, y: 0, w: 1280, h: 720, path: "sprites/background.png" }

+   args.outputs.sprites << { **args.state.plane_pos,
+                             path: "sprites/Planes/planeRed1.png" }
  end
Note that order is important here: Had we drawn the plane before the background, it would be covered by it and invisible! And voilà, here's our plane hovering in front of the mountains:
Applying Forces
In the final section of this introduction to DragonRuby, we'll touch on game physics. We'll apply gravity to the plane, and listen for input on the keyboard to nudge it upwards. So, first of all, we define GRAVITY as a constant. Then we have to dig up some high school kinetics. We know that gravity is a force that is directed downwards, and that force equals mass times acceleration. So we initialize a new key on args.state called dy (the difference of the y coordinate from one tick to the next) with 0.
Because it's pointing downward, we then subtract GRAVITY from this variable. What this means is that the distance in y direction covered from frame to frame increases — it accelerates. Finally, we add this distance to the plane's current y position, and the result is an avatar that falls out of the game canvas at the bottom:
+ GRAVITY = 0.5

  def tick args
+   args.state.dy ||= 0
    args.state.plane_pos ||= { x: 640,
                               y: 360,
                               w: 88,
                               h: 73,
                               anchor_x: 0.5,
                               anchor_y: 0.5 }

    args.outputs.sprites << { x: 0 - Kernel.tick_count % 1280, y: 0, w: 1280, h: 720, path: "sprites/background.png" }
    args.outputs.sprites << { x: 1280 - Kernel.tick_count % 1280, y: 0, w: 1280, h: 720, path: "sprites/background.png" }

+   args.state.dy -= GRAVITY

+   args.state.plane_pos.y += args.state.dy

    args.outputs.sprites << { **args.state.plane_pos,
                              path: "sprites/Planes/planeRed1.png" }
endChecking Inputs
Before we close off this article, let's make sure players have a chance to survive the first few seconds. To do this, we are going to listen for input on the space bar or left mouse button to "flap", i.e., make the plane rise a couple of pixels. To simplify things, we are going to just add a constant value to dy:
  GRAVITY = 0.5
+ FLAP_POWER = 10

  def tick args
    args.state.dy ||= 0
    args.state.plane_pos ||= { x: 640,
                               y: 360,
                               w: 88,
                               h: 73,
                               anchor_x: 0.5,
                               anchor_y: 0.5 }

    args.outputs.sprites << { x: 0 - Kernel.tick_count % 1280, y: 0, w: 1280, h: 720, path: "sprites/background.png" }
    args.outputs.sprites << { x: 1280 - Kernel.tick_count % 1280, y: 0, w: 1280, h: 720, path: "sprites/background.png" }

    args.state.dy -= GRAVITY

+   if args.inputs.mouse.down || args.inputs.keyboard.key_down.space
+     args.state.dy += FLAP_POWER
+   end

    args.state.plane_pos.y += args.state.dy

    args.outputs.sprites << { **args.state.plane_pos,
                              path: "sprites/Planes/planeRed1.png" }
  end
Now, whenever a player either clicks the mouse or hits the space bar, the value of FLAP_POWER gets added to the y coordinate difference applied in that tick. The result is that with a little practice, you can let the plane hover:
Wrapping Up
In this first part of our two-part series on DragonRuby, we've taken DragonRuby from a fresh download all the way through to building a basic but playable Flappy Bird clone, covering setup, the game loop, state management, rendering sprites, handling inputs, and applying simple physics.
Along the way, we've seen how DragonRuby's unique MRuby-based runtime and procedural architecture keep things both lightweight and powerful, letting you focus on gameplay rather than boilerplate. While our example is intentionally simple, the same principles scale to more complex projects.
In part two, we'll start layering on mechanics, collisions, and scoring to transform this prototype into a real game.
See you next time!
This post is part of the Game Development with DragonRuby series
- 1An Introduction to Game Development with DragonRuby
- 2Completing, Integrating, and Publishing Our Game with DragonRuby
Published
Wondering what you can do next?
- Subscribe to our Ruby Magic newsletter and never miss an article again.
- Start monitoring your Ruby app with AppSignal.
- Share this article on social media


Julian Rubisch
Our guest author Julian is a freelance Ruby on Rails consultant based in Vienna, specializing in Reactive Rails. Part of the StimulusReflex core team, he has been at the forefront of developing cutting-edge HTML-over-the-wire technology since 2020.
All articles by Julian RubischBecome our next author!


AppSignal monitors your apps
AppSignal provides insights for Ruby, Rails, Elixir, Phoenix, Node.js, Express and many other frameworks and libraries. We are located in beautiful Amsterdam. We love stroopwafels. If you do too, let us know. We might send you some!