
To keep your app secure, you need to control who and what can access it. Access control can be categorized into authentication — "who" to allow — and authorization — "what" they can access.
Authentication is a subject for another day, but when it comes to user authorization, you generally have two ways to go about it: using a role-based or resource-based strategy.
In this two-part series, we'll take a deep dive into using the Action Policy gem for a Ruby on Rails blog application.
In this part, we'll cover the basics of Action Policy.
Let's get started!
Prerequisites
- Ruby (we're using version 3.2.2)
- Rails (using version 7.0.7)
- Some experience using Ruby
Let's get into it by first defining resource-based authorization.
What Is Resource-Based Authorization?
Where role-based authorization focuses on setting user permissions according to predefined user roles, resource-based authorization enforces access by setting rules on the actual resources within an application. Each resource is associated with a policy that explicitly defines what a user can do on that resource.
Even though this article is focused on resource-based authorization, knowing the differences between the two authorization strategies means you are better equipped to know what each can do.
When to Use Role-Based Authorization
You should use role-based authorization for:
- Simple applications - If you're working on an app with a straightforward permissions system and fewer user roles, then a role-based authorization strategy could work for you.
- Well-defined user groups - If your app has well-defined user groups such as "admins", "editors", "writers", and so forth, use role-based authorization as it handles access control at the user role level.
When to Use Resource-Based Authorization
Resource-based authorization is great for:
- Dynamic or complex access control - When your application's authorization needs evolve frequently or are determined by dynamic conditions, then a resource-based authorization system makes for a better choice.
- Fine-grained control - Useful for when you need to allow or deny access to resources based on multiple conditions (for example, a Rails helpdesk app where users submit support tickets based on a list of dynamic categories). Assuming support staff are assigned tickets by category, this is a scenario where resource-based authorization would really shine.
- Object-oriented control - Because resource-based authorization happens at the object level, defining complex object-oriented rules is easier when you use resource-based authorization techniques.
That said, whether you choose between role-based and resource-based authorization will depend on your application's unique characteristics.
Let's now turn our attention to the Action Policy gem.
The Action Policy Gem for Ruby and Rails
Action Policy is a flexible, extensible, and performant authorization framework for Ruby and Rails apps. It uses multiple caching strategies out of the box, making it very fast, especially if your authorization rules require database queries.
Another feature that makes this gem ideal for building resource-based rules is its ability to be customized. It provides several Ruby classes and modules that can be combined in many ways. You can pretty much set fine-grained access control rules beyond Rails controller, anywhere in your app.
Check out the Action Policy project homepage to learn more.
Now let's go over the Rails app we'll be building today.
Create the Rails App
Moving forward, we'll reference a Rails 7 blog application where users can Create, Read, Update, and Delete (CRUD) posts.
We'll progressively define an action policy for the Post model that offers resource-based access control. You'll learn how to use Action Policy to make this access control strategy work.
Go ahead and generate a new Rails application:
rails new blog_app
Note: We'll use Pico CSS styles for our example app, but you can use whatever you like.
Then quickly scaffold a Post resource that we'll use throughout the rest of the tutorial:
rails g scaffold Post title body
Now run the migration with rails db:migrate.
Setting up User Authentication
As much as this article is about user authorization, there's something important we need to cover: user authentication. Without it, any authorization policies we try to define later on will be useless. But there is no need to write authentication from scratch. Let's use Devise.
Installing Devise
Begin by adding the Devise gem to your Gemfile:
# Gemfile

gem "devise"
Then install it and generate a User model:
bundle install
rails generate devise:install
rails generate devise User
rails db:create
rails db:migrate
Also, remember to add config.action_mailer.default_url_options = { host: 'localhost', port: 3000 } to the app's development configuration.
Next up, let's implement a few basic user roles to test different user access scenarios for the Post resource.
Defining Basic User Roles
First, add the role column to the user table. Run this command to generate a migration:
rails g migration AddColumnRoleToUser role:integer
Note: We use an integer data type for the role, so we can use an enum — a quick and easy way to implement roles.
Now run the migration with rails db:migrate, then open up the User model and edit it:
# app/models/users.rb

class User < ApplicationRecord
  devise :database_authenticatable, :registerable,
         :recoverable, :rememberable, :validatable

         enum :role, { reader: 0, author: 1, editor: 2 }
end
With that done, let's shift our focus to installing Action Policy.
Setting up Action Policy for Ruby and Rails
Open the app's Gemfile and add the line below:
#  Gemfile

gem "action_policy"
Then run the command bundle install to install Action Policy.
Finalize the installation by running:
rails g action_policy:install
This should give us a base — the ApplicationPolicy class under app/policies:
# app/policies/application_policy.rb

class ApplicationPolicy < ActionPolicy::Base
end
Basic Usage of Action Policy
Action Policy's core foundation is a policy class, ApplicationPolicy, where you can define global configurations from which all policies can inherit. A good recommendation is to place all policies under app/policies, and to separate policies according to the resources in your app. For example, if you have a Post resource, the corresponding policy should be PostPolicy, CommentPolicy would accompany a Comment resource, and so forth.
One more thing to consider when working with Action Policy: rule definitions must happen within public methods in policy classes. Using a private method will raise an error.
Moving on, let's use this information to create a PostPolicy where we'll progressively build various levels of user access.
Creating Our First Policy
Create a new file named post_policy.rb under app/policies:
# app/policies/post_policy.rb

class PostPolicy < ApplicationPolicy
    def show?
      true
    end
end
Here, we define a simple rule on the Post resource declaring that anyone can access a Post.
Associating Posts to Users
To work with this new post policy, we need to modify the Post resource we generated earlier so that it's associated with a logged-in user on creation (by adding a user_id column to the posts table):
rails g migration AddColumnUserIDToPost user_id:integer
Then run the migration with rails db:migrate.
Next, we need to modify the posts controller to account for this change. First, let's add user_id to the allowed post_params:
# app/controllers/posts_controller.rb

class PostsController < ApplicationController

    ...

    private

    def post_params
      params.require(:post).permit(:title, :body, :user_id)
    end
end
Then modify the create action:
# app/controllers/posts_controller.rb

class PostsController < ApplicationController

    ...

    def create
        @post = Post.new(post_params)
        @post.user_id = current_user.id # Devise gives us the logged in user as a helper method `current_user`

        respond_to do |format|
            if @post.save
                ...
            end
        end
    end

    ...
end
Next, let's secure the PostsController.
Implementing Authorization in Controllers
We need to modify the PostsController with a callback to only allow access to logged-in users:
# app/controllers/posts_controller.rb

class PostsController < ApplicationController

  before_action :authenticate_user!, except: :show

  ...
end
Next, let's use the new Post policy to add some basic user access controls:
# app/policies/post_policy.rb

class PostPolicy < ApplicationPolicy
    ...

    def update?
    # post can only be updated by an author role or the post's author
      user.author? || (user.id == record.user_id)
    end

    def destroy?
    # a post can only be deleted by its author
      user.id == record.user_id
    end
end
Here, we define an access rule on the posts controller's update and destroy actions. We specify that a post's author (or a user with the "author" role) can update a post, but only a post's author can delete a post.
Quick tip: Action Policy can reference the current_user provided by Devise and assign it to a user within the policy.
Next, we need to use the access rule in the posts controller like so:
# app/controllers/posts_controller.rb

class PostsController < ApplicationController
  before_action :set_post, only: %i[ show edit update destroy ]
  ...

  def update
    authorize! @post # Add this line
    respond_to do |format|
      if @post.update(post_params)
        ...
      end
    end
  end

  def destroy
    authorize! @post # Add this line
    @post.destroy
    ...
  end

  ...
end
With the access rule applied to the posts controller, our next course of action is to ensure the views are protected.
Protecting Views with Authorization
In the screenshot below, a user with the email <user2@example.com> and "reader" role is logged in. As you can see, this user can view the post created by <user@example.com>, and they even have access to the edit and delete links for this post. This is not ideal — the edit and delete links should only be available to the post's author.

Our first task will be to remove access to these links for users that aren't authors of a post. Since we've already defined this access rule, we only need to apply it to the show view using Action Policy's nifty allowed_to? method:
<!-- app/views/posts/show.html.erb -->

<%= render @post %>


<div>
  <% if allowed_to?(:update?, @post) %>
    <%= link_to "Edit this post", edit_post_path(@post) %>
  <% end %>

  <% if allowed_to?(:destroy?, @post) %>
    <%= button_to "Destroy this post", @post, method: :delete %>
  <% end %>

  <%= link_to "Back to posts", posts_path %>
</div>
With this rule applied, we can now refresh the post's show page and see what we get:
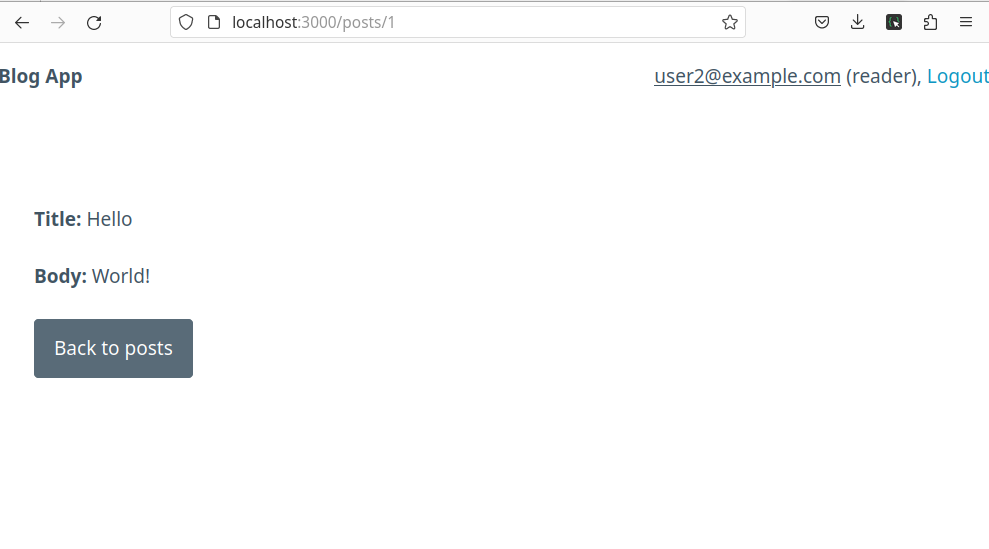
The same user who had access is now limited in what they can do while on a post's view.
Wrapping Up
In the first part of this two-part series, we've learned some of the basics around the authorization gem Action Policy.
In the second and final part, we'll explore some more advanced use cases.
Happy coding!
P.S. If you'd like to read Ruby Magic posts as soon as they get off the press, subscribe to our Ruby Magic newsletter and never miss a single post!