
Complex functionality can take a while to load. Users, in general, don't like to wait, so solutions must evolve.
If you are already familiar with async/await in JavaScript, think of await as the place where blocking logically occurs. This forces the algorithm to wait, and technically, it's still synchronous code.
Step functions allow long-running processes to run in the background asynchronously, so the logic does not get blocked and force people to wait.
Let's take a look at how to use AWS step functions with Node.
Our Example: A Resume Uploader
We will be building a resume uploader that curates resumes for a recruiter. First, a resume gets uploaded in S3 and runs asynchronously via step functions. We will use AI tools in AWS like Textract to parse the resume.
Then, the result goes in SQS for asynchronous consumption. The SQS entry will have a direct link to the resume, and a link to the GitHub repo found in the resume.
You can follow along or clone the repo from GitHub. Some familiarity with Node and NPM is expected, but no prior experience with AWS is required.
Ready? Let’s go!
First, fire up a project folder and a couple of sub-folders for each step function. This is the basic folder structure:
node-aws-step-functions
`-- look-for-github-profile-step
`-- upload-resume-step
In each sub-folder, fire up npm init to create a package.json file. Simply make sure the name property in the JSON matches the folder name.
Deploy Your Node.js Lambda Step Functions with Claudia.js
We will use Claudia.js to deploy the Lambda functions for each step. Be sure to add this dev dependency for each sub-folder.
> npm i claudia@latest --save-dev
Also, open both package.json files side-by-side, then specify these commands in the scripts section.
"scripts": {
  "start": "claudia create --region us-east-1 --no-optional-dependencies --handler main.handler --runtime nodejs18.x --memory 1024 --arch arm64",
  "deploy": "claudia update --no-optional-dependencies --handler main.handler"
}
This deploys your Lambda step function in AWS. Double-check the region (here, it’s us-east-1) and ensure it is the one closest to you. Be sure to have proper credentials on your machine to successfully deploy the Lambda function.
Note: Setting up your Lambda function locally to authenticate to AWS is outside the scope of this tutorial.
Next, go into the look-for-github-profile-step project folder and add this dependency:
> npm i @aws-sdk/client-textract@latest --save
Then, go into the upload-resume-step project folder and add these dependencies:
> npm i @aws-sdk/client-s3@latest @aws-sdk/s3-request-presigner@latest --save
With both package.json files taking shape, it’s time to start writing code.
look-for-github-profile-step
Create a main.js file inside the look-for-github-profile-step project folder. Implement the code that parses the resume and plucks the GitHub profile URL. This step function is responsible for using Textract (an AI service from AWS) and passing state back to the state machine.
const {
  TextractClient,
  DetectDocumentTextCommand,
} = require("@aws-sdk/client-textract");

const textractClient = new TextractClient({ region: "us-east-1" });

const s3BucketName = "resume-uploader-upload-<unique-name>"; // must be unique

// lambda step function handler function
exports.handler = async (event, _context, callback) => {
  const command = new DetectDocumentTextCommand({
    Document: {
      S3Object: {
        Bucket: s3BucketName,
        Name: event.storedFileName,
      },
    },
  });

  const detectResponse = await textractClient.send(command);

  event.githubProfileUrl = detectResponse.Blocks.find(
    // parser
    (b) => b.BlockType === "WORD" && b.Text.includes("github.com")
  )?.Text;

  callback(null, event); // state machine
};
The Textract client can use S3 to find the uploaded resume and parse the document. Then, we simply nab a word match that includes the GitHub URL.
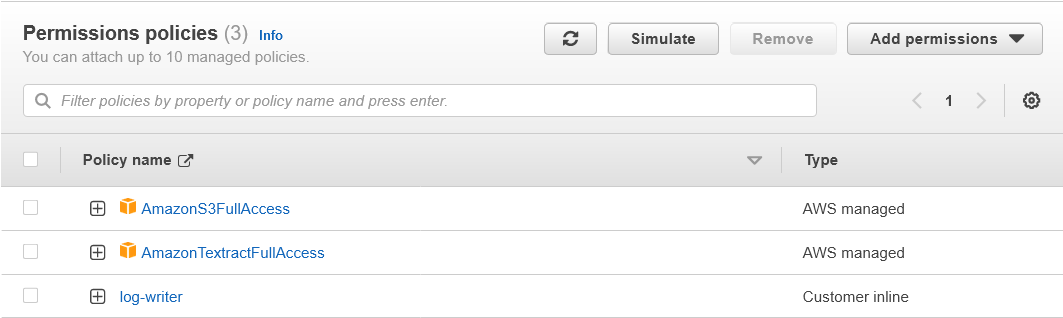
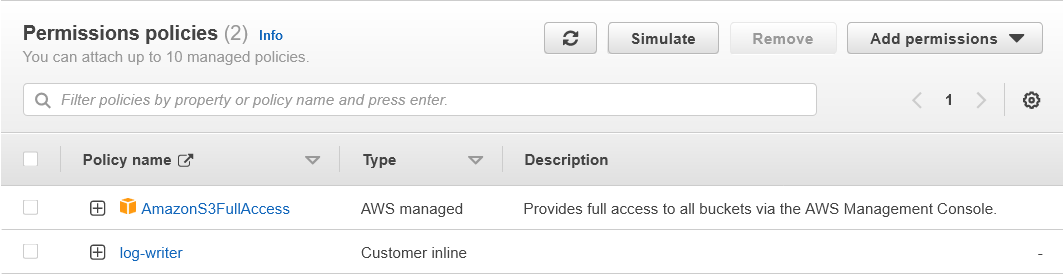
Run npm start to get this Lambda function on AWS. Once done, be sure to grant AmazonS3FullAccess and AmazonTextractFullAccess permissions to the look-for-github-profile-step-executor role in IAM.
upload-resume-step
Next, create a main.js file inside the upload-resume-step project folder. This time, put some code in place that makes the download link available.
const { GetObjectCommand, S3Client } = require("@aws-sdk/client-s3");
const { getSignedUrl } = require("@aws-sdk/s3-request-presigner");

const s3Client = new S3Client("us-east-1");

const s3BucketName = "resume-uploader-upload-<unique-name>"; // must be unique
const signedUrlExpireSeconds = 24 * 60 * 60; // 1 day

exports.handler = async (event, _context, callback) => {
  const command = new GetObjectCommand({
    Bucket: s3BucketName,
    Key: event.storedFileName,
  });

  event.storedFileUrl = await getSignedUrl(s3Client, command, {
    expiresIn: signedUrlExpireSeconds,
  }); // URL for download

  callback(null, event); // state machine
};
The function that does most of the work here is getSignedUrl, which makes the URL available for download.
Simply run npm start. Once done, be sure to grant AmazonS3FullAccess permissions to the upload-resume-step-executor role in IAM.
Build A State Machine in AWS
The step functions above can run in isolation, but belong in a complex state machine that orchestrates execution. The state machine does this via events and fires one step function at a time. Keep in mind that this is happening in the background, and the only way to interact with the asynchronous process is via the state machine.
In AWS, create a state machine under 'Step Functions'. Pick the 'Write your workflow in code' option, and click 'Express'. Also, click on 'Create a new role' under 'Permissions'. The role is automatically created by the wizard.
Below is the workflow definition for the state machine:
{
  "Comment": "Resume Uploader State Machine",
  "StartAt": "UploadResume",
  "States": {
    "UploadResume": {
      "Type": "Task",
      "Resource": "{UploadResume.Arn}",
      "Next": "LookForGithubProfile"
    },
    "LookForGithubProfile": {
      "Type": "Task",
      "Resource": "{LookForGithubProfile.Arn}",
      "Next": "QueueResume"
    },
    "QueueResume": {
      "Type": "Task",
      "Resource": "arn:aws:states:::sqs:sendMessage",
      "Parameters": {
        "QueueUrl": "{Sqs.Url}",
        "MessageBody": {
          "storedFileUrl.$": "$.storedFileUrl",
          "githubProfileUrl.$": "$.githubProfileUrl"
        }
      },
      "End": true
    }
  }
}
Be sure to specify the correct values for {UploadResume.Arn}, {LookForGithubProfile.Arn}, and {Sqs.Url}.
The Arn is the Amazon Resource Name of a Lambda function, shown on the page's upper right corner.
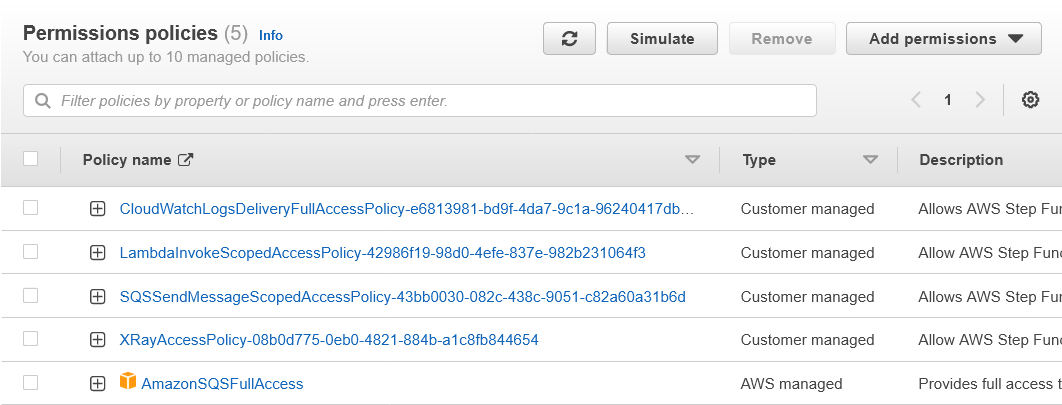
Lastly, you will need to create an SQS queue and then grant access to SQS from the state machine in IAM. Find the role assigned to the state machine and grant AmazonSQSFullAccess permissions. This is the role automatically created by the state machine create wizard.
Here is how the state machine looks after it's configured correctly:

Add Webpack to Step Functions
A good technique for keeping your Lambda functions small and fast is to bundle assets. This lets the VM spin up quickly and execute the code, which helps with cold starts.
First, add the webpack dependency to both step functions:
> npm i webpack@latest webpack-cli@latest --save-dev
Open both package.json files side-by-side. Edit the start and deploy commands under the scripts section and change the --handler function to --handler pub/bundle.handler. Also, edit the dependencies section name — call it optionalDependencies. This prevents all NPM dependencies from getting added to the bundle via npm pack, which is what the deploy tool uses.
Then, add a bundle command under scripts:
"bundle": "webpack"
With these package.json changes in place, add this webpack.config.js file to both step functions:
const path = require("path");

module.exports = {
  entry: [path.join(__dirname, "main.js")],
  output: {
    path: path.join(__dirname, "pub"),
    filename: "bundle.js",
    libraryTarget: "commonjs",
  },
  target: "node",
  mode: "production",
};
Lastly, create an .npmignore file:
node_modules/
claudia.json
webpack.config.js
This is what bundles all dependencies using the entry point main.js. Webpack will then shake tree dependencies and only add what is necessary to the bundle that gets uploaded on AWS. .npmignore tells npm pack to exclude what is not needed in the final bundle output.
Be sure to run npm run bundle && npm run deploy to get these changes out on both step functions.
Testing the Step Functions
Finally, double-check permissions in IAM. There are two executor roles, and one role assigned to the state machine. If permissions are not set correctly, you'll see failed executions in CloudWatch alongside useful error messages.
Create an S3 bucket with the name resume-uploader-upload-<unique-name>. Due to a limitation in AWS, keep in mind this bucket name must be unique — so add your name or anything else that makes the bucket unique. Double-check that the bucket name matches what is defined in the code.
Then, add a resume in PDF format — for example, ExampleResume.pdf. There is a sample resume in the GitHub repo in case you need one. Since Textract looks for a GitHub profile in the resume, ensure a link is specified.
To test the step functions:
> aws stepfunctions start-execution --state-machine-arn <arn> --input "{\"storedFileName\":\"ExampleResume.pdf\"}"
The ARN is available in AWS under the state machine. This command returns immediately, and you can check on the asynchronous processing via step functions on the AWS console.
The entire asynchronous process can take a few seconds because parsing a resume takes a long time.
Assuming everything executes successfully, the SQS queue should have a message available:
> aws sqs receive-message --queue-url <queue-url>
If nothing shows up in SQS, simply go to 'Step Functions' in AWS and click on your state machine. The console has an 'Executions' tab with status information. There are also logs available via CloudWatch.
Next Up
In this post, we covered how to deploy Lambda step functions in AWS using Claudia.js. We then built a state machine and deployed our step function to AWS, before testing it.
This is only the asynchronous part of a more complex solution. There is an increased demand for low-latency solutions, and users expect no less.
In the next and final part of this series, we will build the client-facing API.
Happy coding!
P.S. If you liked this post, subscribe to our JavaScript Sorcery list for a monthly deep dive into more magical JavaScript tips and tricks.
P.P.S. If you need an APM for your Node.js app, go and check out the AppSignal APM for Node.js.