
Welcome to the final part of our Express to Fastify series. In the previous installments, we explored the unique features and advantages of Fastify over Express. Now, you'll put what you've learned so far into practice by migrating an existing Express application to Fastify.
You'll avoid rewriting an entire application from scratch by gradually transitioning to Fastify. After reading this article, you'll have the skills to confidently migrate your Express applications and enjoy the benefits of the Fastify framework.
Let's get started!
Prerequisites
Before proceeding with the article, ensure that you have a recent version of Node.js and npm installed on your computer. You also need to install MongoDB and ensure that it is running on port 27017.
Setting Up the Demo Project
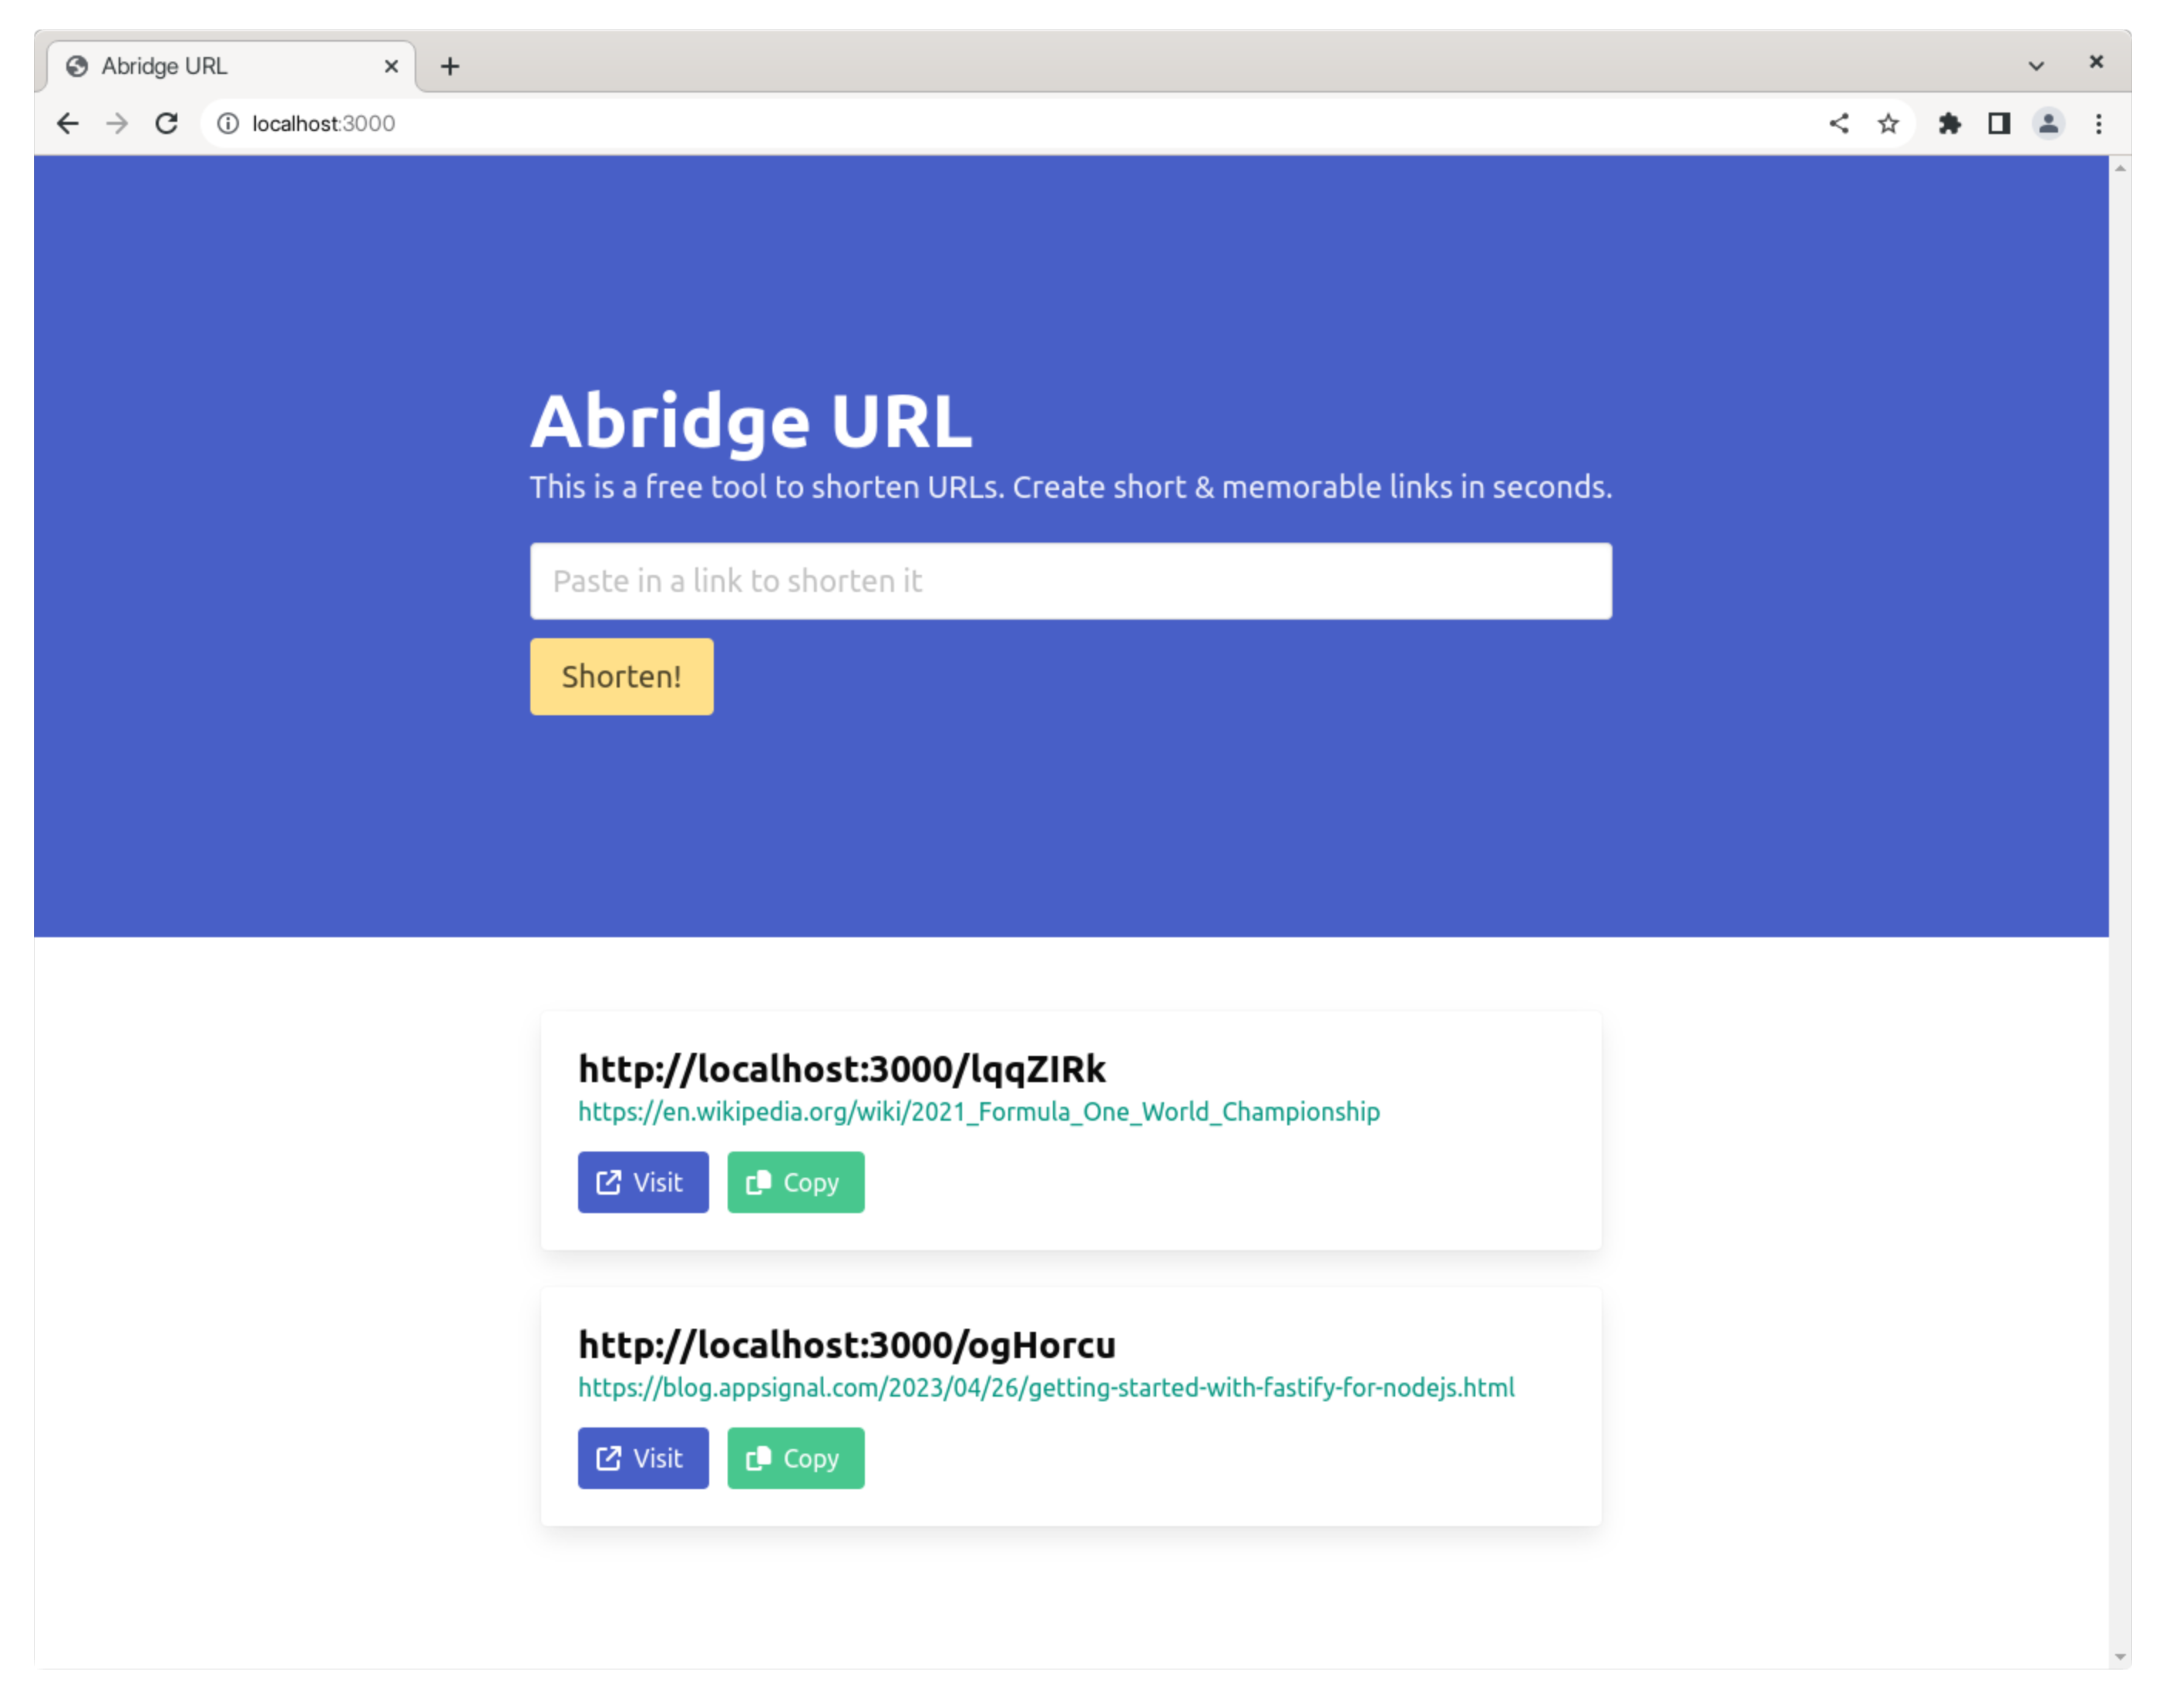
To illustrate the process of migrating from Express to Fastify, we have prepared a demo application. This application utilizes Express, Mongoose, and Pug to create a URL Shortener app as follows:
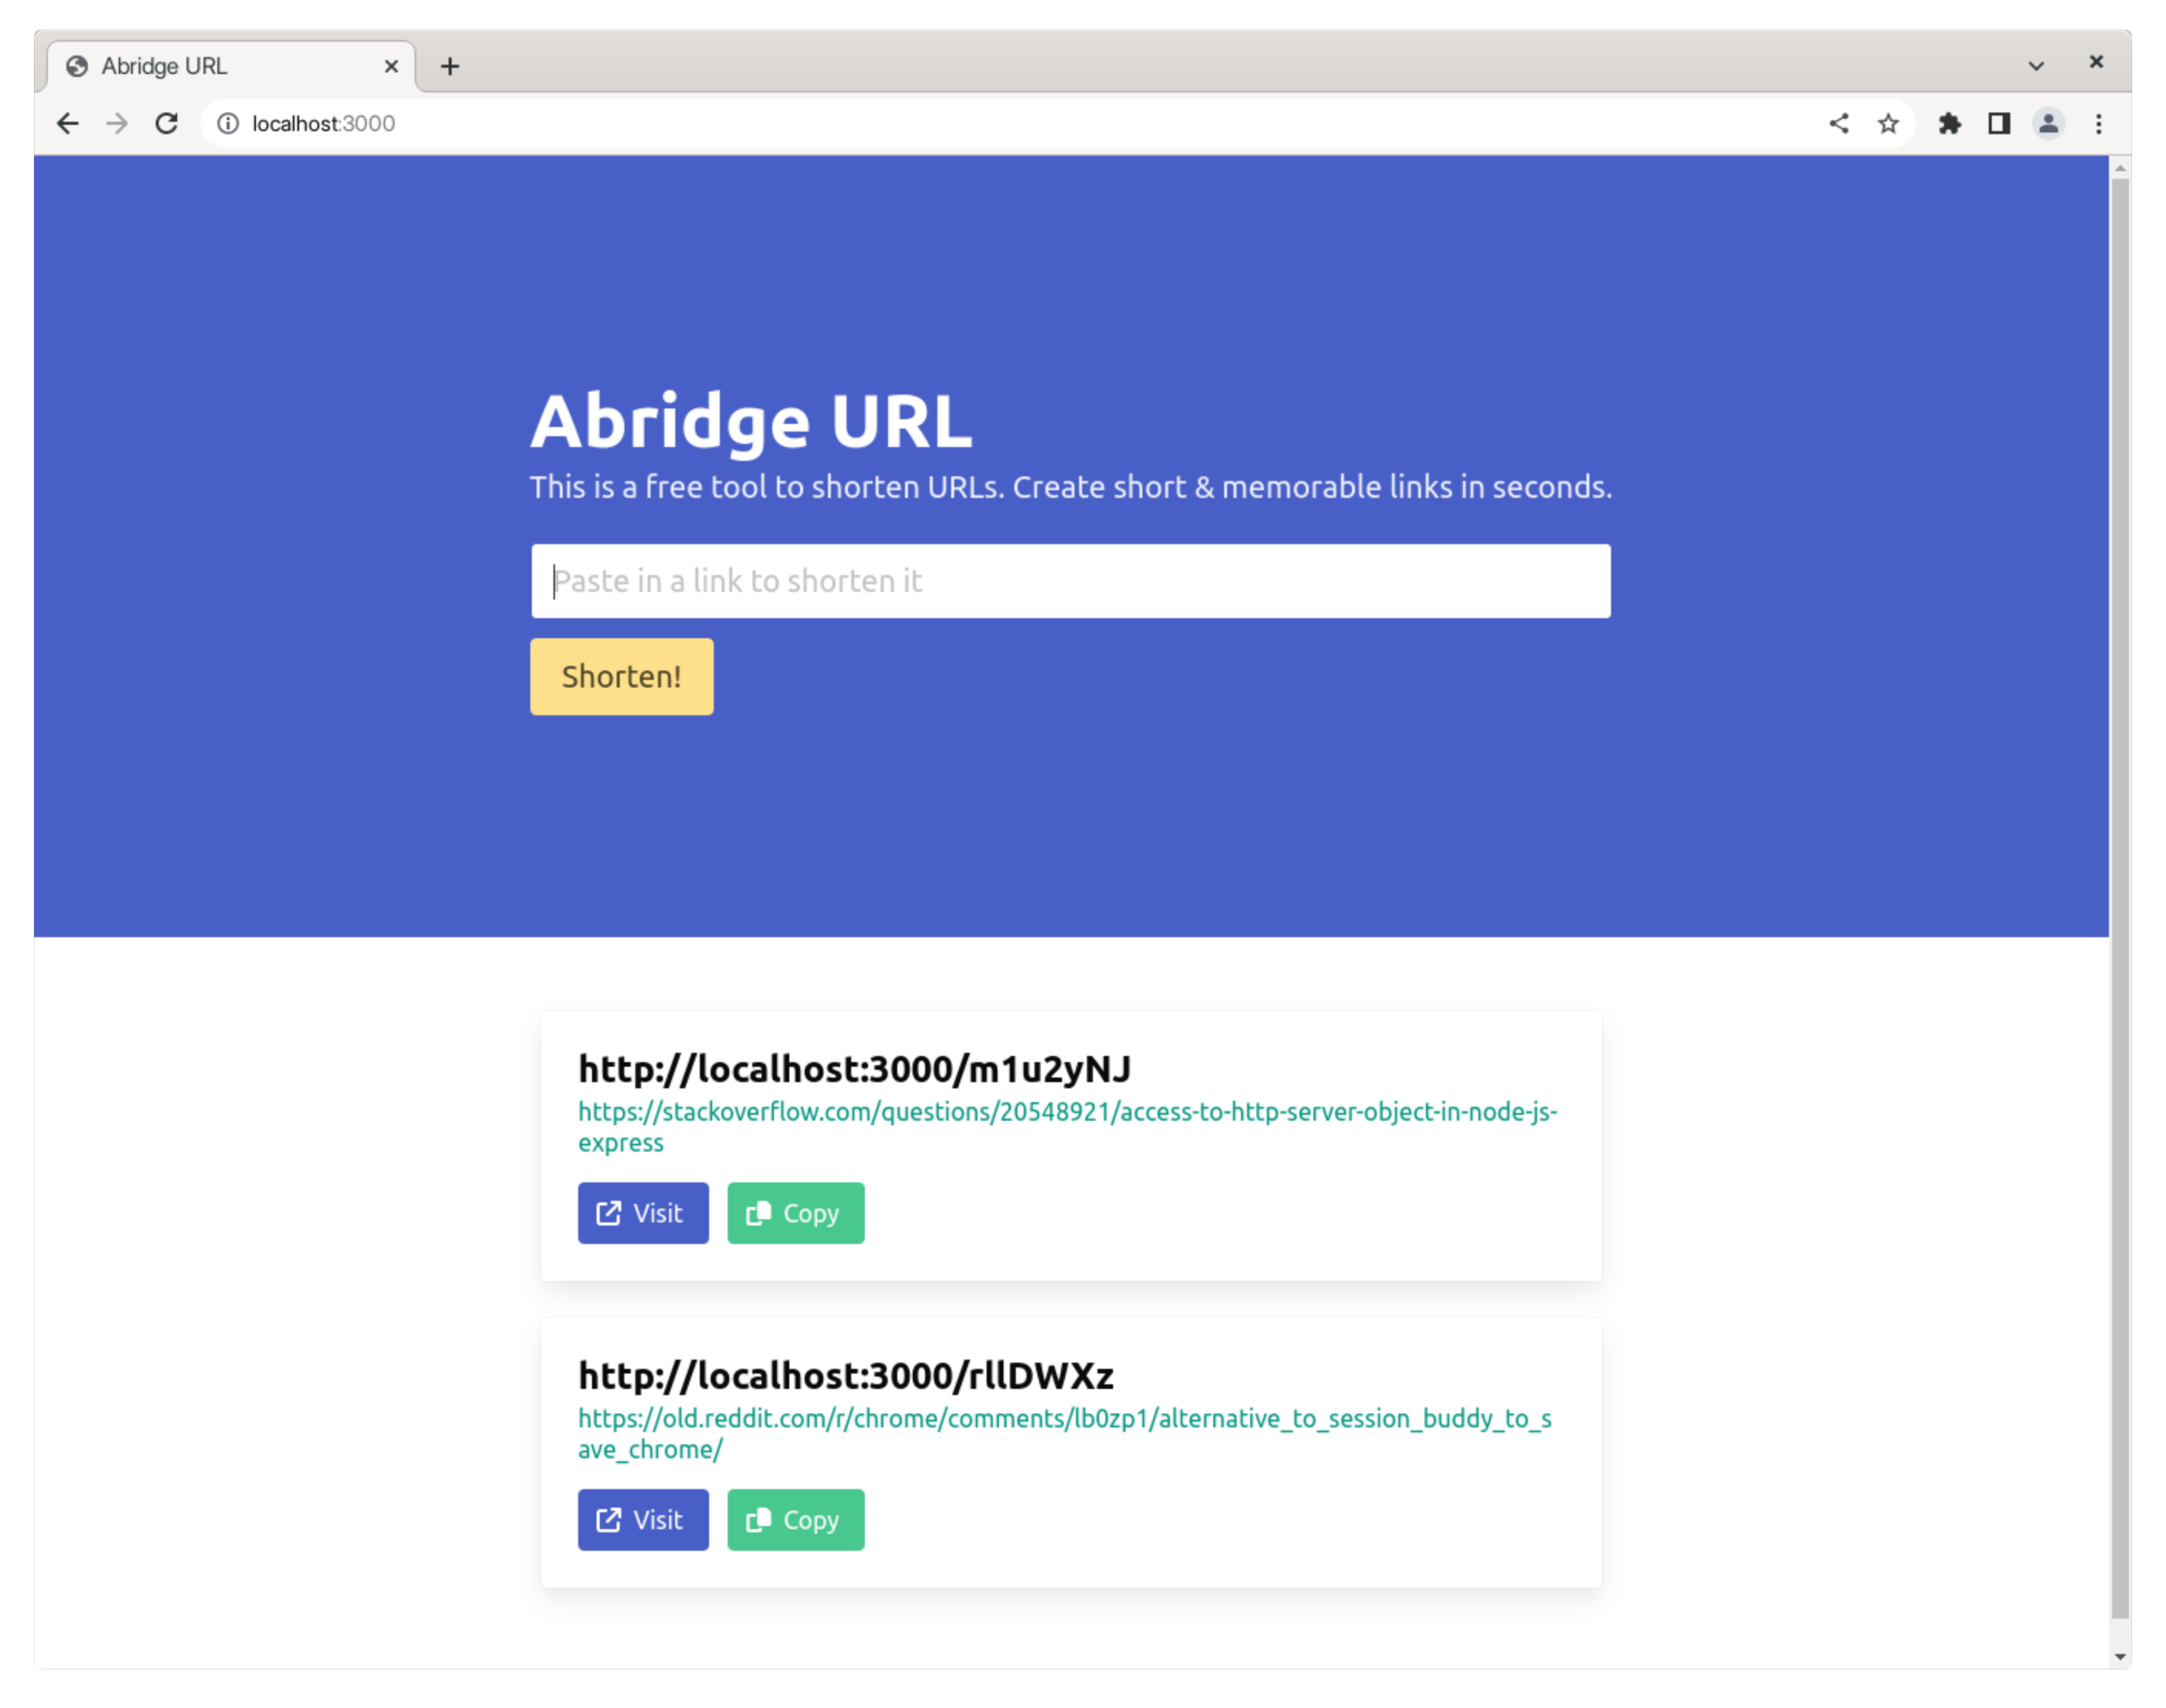
After you submit a URL through the form, the application generates a shortened URL that can be copied and used elsewhere.
Go ahead and clone the repository to your computer using the following command:
git clone https://github.com/damilolaolatunji/node-url-shortener
Afterward, cd into the project directory and install the application
dependencies with npm:
npm install
Once the process completes, rename the .env.sample file to .env and edit it
as follows:
NODE_ENV=development
LOG_LEVEL=debug
PORT=3000
MONGODB_URL=mongodb://127.0.0.1:27017/url_shortener
APPSIGNAL_PUSH_API_KEY=<your_appsignal_push_api_key>
The application is configured to use AppSignal for log management and error tracking, so you can easily monitor and troubleshoot any issues that may occur. AppSignal provides real-time alerts and detailed error reports, allowing you to quickly identify and fix the root cause of errors before they become major problems.
If you want to see this in action, sign up for an AppSignal account (you can do a 30-day free trial, no credit card required), then create a new application and copy the Push API Key under Push & Deploy in the APP SETTINGS page.
Once you've done that, replace the
<your_appsignal_push_api_key> placeholder in the .env file. Note that this
step is not required to complete the migration to Fastify.
You can then start the development server by executing the command below:
npm run start:dev
The following output indicates that the server started successfully:
[nodemon] starting `node src/index.js`
{"level":"info","message":"Connected to MongoDB","timestamp":"2023-05-03T12:26:07.746Z"}
{"level":"info","message":"URL Shortener is running in development mode → PORT 3000","timestamp":"2023-05-03T12:26:07.753Z"}
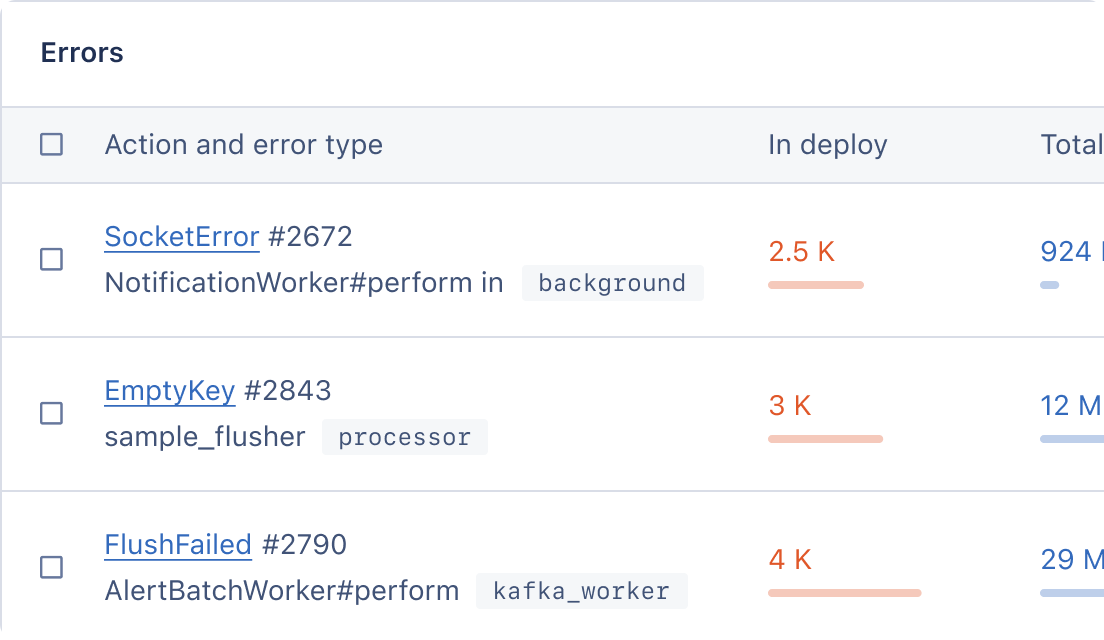
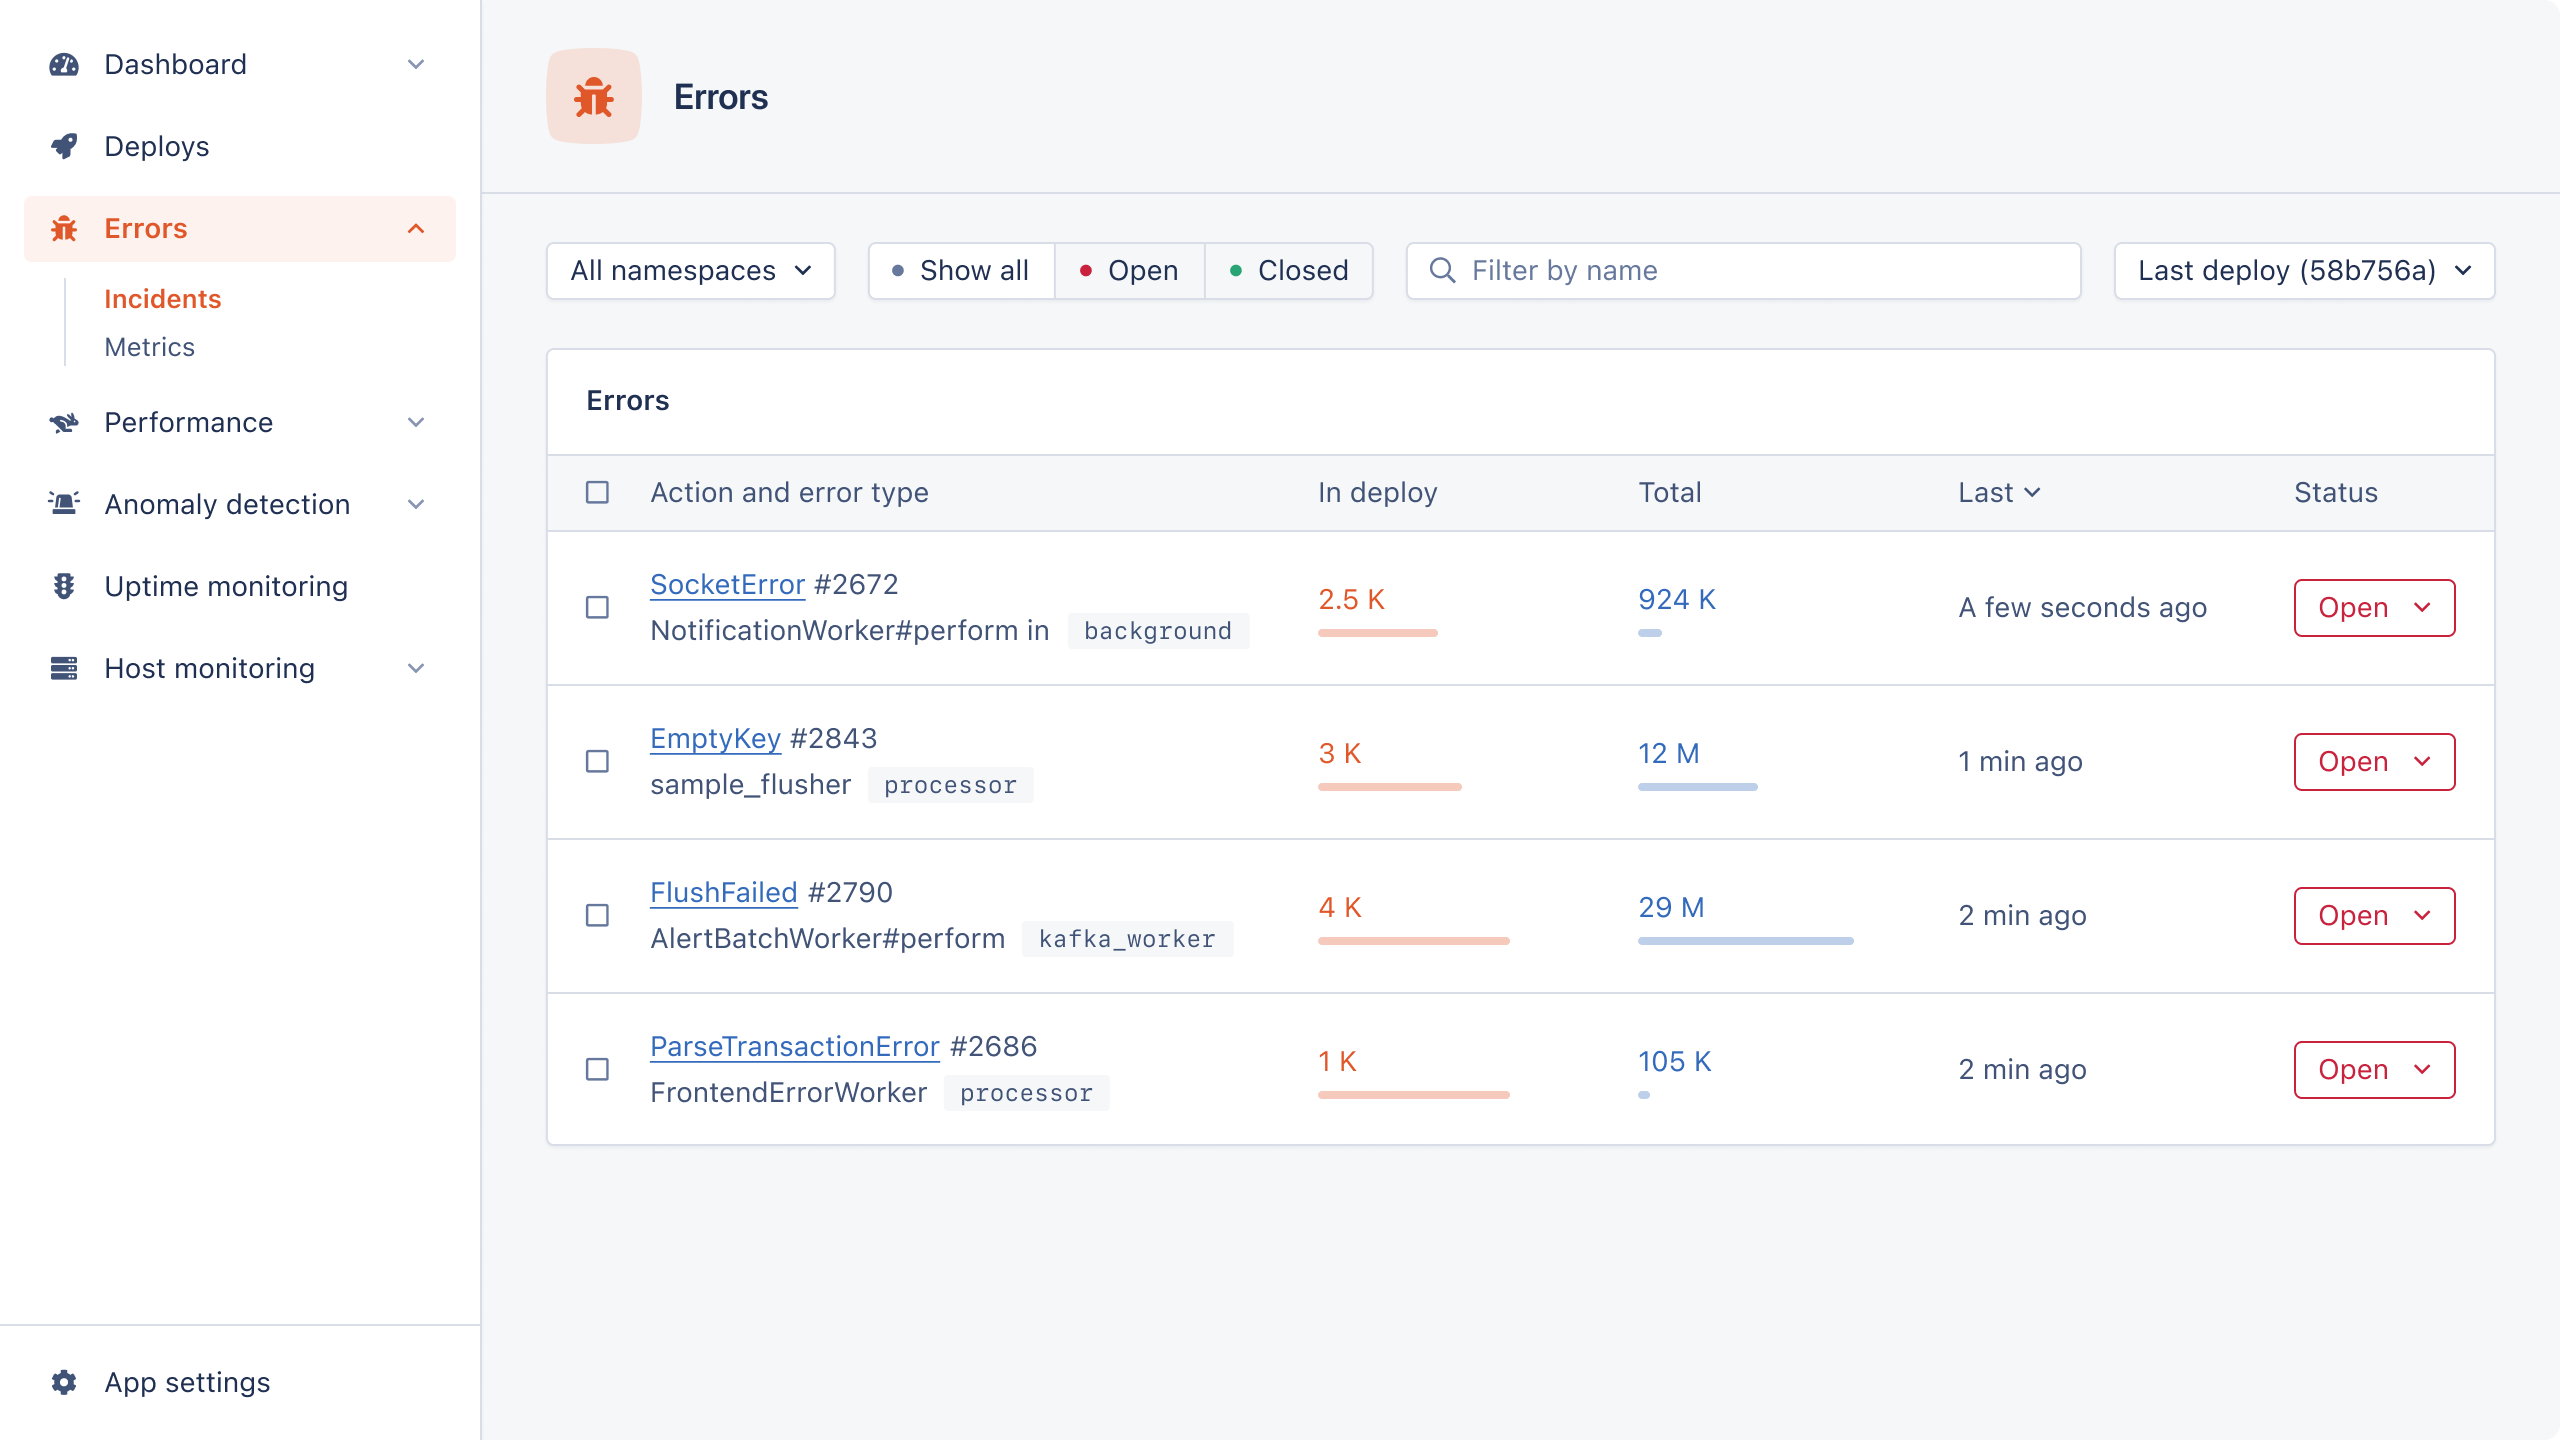
You will also observe that your application's logs will start to appear in the logging dashboard in AppSignal:
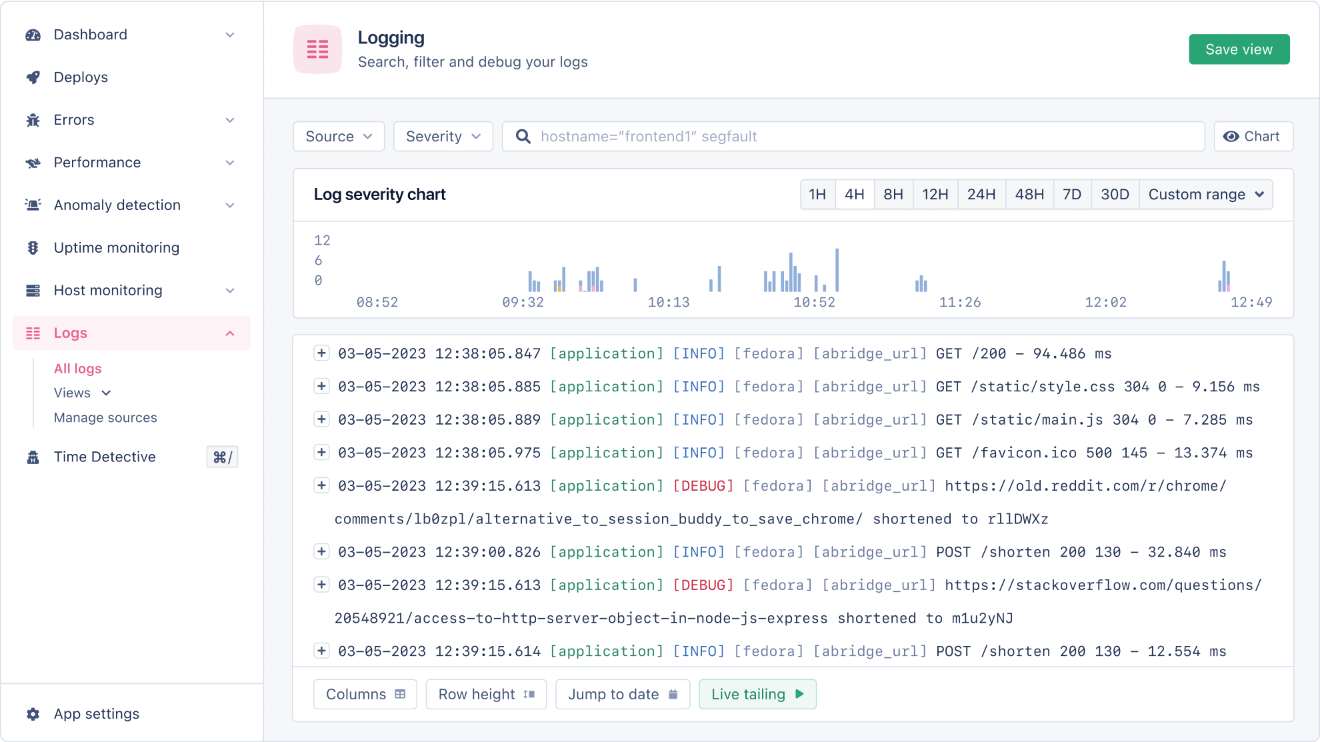
From here, you can perform all kinds of actions to monitor and troubleshoot your application.
Now head over to http://localhost:3000 to see the application in action!
Examining the Project Structure
The URL Shortener application is composed of several files and directories as shown below:
.
├── package.json
├── package-lock.json
├── README.md
└── src
    ├── app.js
    ├── appsignal.js
    ├── config
    │   ├── config.js
    │   └── logger.js
    ├── controllers
    │   ├── root.controller.js
    │   └── url.controller.js
    ├── index.js
    ├── middleware
    │   ├── error.js
    │   ├── requestLogger.js
    │   └── validator.js
    ├── models
    │   ├── plugins
    │   │   └── toJSON.plugin.js
    │   └── url.model.js
    ├── public
    │   ├── main.js
    │   └── style.css
    ├── routes
    │   └── routes.js
    ├── schemas
    │   └── url.schema.js
    └── views
        ├── default.pug
        └── home.pug
Here's a brief explanation of the most important ones:
src/index.js: The entry point of the application.src/app.js: Where the Express app is configured.src/appsignal.js: Initializes AppSignal integration.src/public/: Contains static CSS and JavaScript files.src/views/: Contains the Pug templates for the app.src/routes/routes.js: Configures the application routes.src/config/: Contains configuration for the Winston logger and environment variables.src/models/: Has the schema definitions for Mongoose.src/controllers/: Includes the business logic for the application routes.src/middleware/: Contains some useful middleware functions.
We'll examine most of these files' content as we migrate our application to Fastify.
In the next section, we'll install Fastify in the project and create a new Fastify application that embeds the original Express app to kickstart our incremental migration.
Migrating from Express to Fastify
As mentioned in part 2 of this series, using the @fastify/express plugin is the quickest way to get your existing Express application working with Fastify. The plugin adds full Express compatibility to Fastify so that you can easily use any Express middleware — or even an entire Express application — with your Fastify instance, and it will just work with no changes required.
Go ahead and install the fastify and @fastify/express packages into your
project:
npm install fastify @fastify/express
Once they are both installed, import them at the start of your app.js file as
follows:
// app.js
import Fastify from "fastify";
import fastifyExpress from "@fastify/express";
Afterward, create a new Fastify application instance near the bottom of the file
and register the fastifyExpress plugin. Also, register the expressApp
on the Fastify instance, then change the file export from expressApp to
fastifyApp:
// app.js
. . .
expressApp.use(expressErrorHandler());
expressApp.use(errorHandler);

const fastifyApp = Fastify();

await fastifyApp.register(fastifyExpress);
fastifyApp.use(expressApp);

export default fastifyApp;
At this point, app.js exposes a Fastify application that embeds a
fully-featured Express application with its own routes, middleware, and plugins.
Before testing your changes, you also need to modify your index.js file as
shown below. You only need to change the part of the code that listens for
connections on the configured port:
//app.js
. . .

  logger.info('Connected to MongoDB');

  const address = await app.listen({ port: config.port });
  logger.info(
    `URL Shortener is running in ${config.env} mode → PORT ${address}`
  );

. . .
With these changes in place, your application should continue working as before.
Fastify is now being used to start the server, but the entire service functionality remains in the Express application. In the next section, we'll start migrating our routes to Fastify.
Migrating Express Routes to Fastify
The Express router currently does our application routing, but we'll start
migrating the routes to Fastify in this section. Open your routes/routes.js
file and add the following code:
// routes/routes.js
. . .
export async function fastifyRoutes(fastify) {
}

export default router;
The fastifyRoutes function represents a new plugin context that will contain
our application routes. To migrate an Express route to Fastify, you need to:
- Remove the route from the
express.Routerinstance. - Register the route on the
fastifyinstance in the plugin function. - Update the route itself so that it conforms to the Fastify API.
Let's follow the above steps for the / route and see how far we get.
First,
delete the following line of code in the routes.js file:
// routes/routes.js
router.get("/", rootController.render);
Next, register the / route in fastifyRoutes as follows:
// routes/routes.js
export async function fastifyRoutes(fastify) {
  fastify.get("/", rootController.render);
}
Afterward, open the controllers/root.controller.js and examine its content:
// controller/root.controller.js
function render(req, res) {
  res.render("home");
}

export default { render };
This route renders the src/views/home.pug file and returns the resulting HTML
string to the client. In the app.js file, Express is configured to work with
Pug templates through the following lines of code:
// app.js
expressApp.set("view engine", "pug");
expressApp.set("views", path.join(__dirname, "views"));
Since we've migrated our only application route that renders templates, the
above lines are no longer needed and can be safely deleted. But you now need to
configure Fastify to render the Pug template through the
@fastify/view plugin. It decorates
the Reply interface with a method that we'll then use to render the template.
Go ahead and install the plugin first:
npm install @fastify/view
Then import it into the app.js file shown below. You also need to import
pug as well:
// app.js
. . .
import fastifyView from '@fastify/view';
import pug from 'pug';
Below the fastifyApp declaration, add the following lines to register the
fastifyView plugin:
// app.js
. . .
const fastifyApp = Fastify();

await fastifyApp.register(fastifyView, {
  engine: {
    pug,
  },
  root: path.join(__dirname, 'views'),
  propertyName: 'render',
  viewExt: 'pug',
});
. . .
At this point, your Fastify application is now ready to work with Pug templates.
You only need to register the fastifyRoutes plugin in your fastifyApp
instance as shown below:
// app.js
import routes, { fastifyRoutes } from './routes/routes.js';

. . .

await fastifyApp.register(fastifyRoutes);
You can also update the rootController.render method as follows so that it
conforms with Fastify's naming convention:
function render(req, reply) {
  reply.render("home");
}

export default { render };
With the above changes in place, the application should
continue working as before. The / route is handled by Fastify, while
the other two routes remain routed through Express. In this manner, you can eventually
migrate all your Express routes to Fastify.
Migrating the Rest of the Express Routes
In this section, we'll migrate the remaining two Express routes to Fastify.
Start by updating the routes.js file as follows:
// routes/routes.js
import urlSchema from "../schemas/url.schema.js";
import urlController from "../controllers/url.controller.js";
import rootController from "../controllers/root.controller.js";

export default async function fastifyRoutes(fastify) {
  fastify.get("/", rootController.render);

  fastify.post(
    "/shorten",
    {
      schema: {
        body: urlSchema,
      },
    },
    urlController.shorten
  );

  fastify.get("/:shortID", urlController.redirect);
}
Since Fastify supports schema validation with
Ajv, the validate module is no longer
required on the /shorten route, and we can specify the JSON schema directly on
the route. The controllers for both routes will largely remain the same, except
that the res parameter is renamed to reply as before:
// controllers/url.controller.js
async function shorten(req, reply) {
  const { shortID, destination } = await Url.findOrCreate(req.body.destination);

  logger.debug(`${destination} shortened to ${shortID}`, {
    shortID,
    destination,
  });

  reply.send({ shortID, destination });
}

async function redirect(req, reply) {
  const { shortID } = req.params;

  const { destination } = await Url.findOne({ shortID });

  logger.debug(`redirecting /${shortID} to ${destination}`, {
    shortID,
    destination,
  });

  reply.redirect(destination);
}

export default { shorten, redirect };
Finally, head back to the app.js file and fix the routes import since
fastifyRoutes is now the default export:
// app.js
import routes from "./routes/routes.js";
Now all our Express routes have been migrated over to Fastify. You can safely remove these lines:
// app.js
expressApp.use(express.json());
expressApp.use(express.urlencoded({ extended: true }));

. . .
expressApp.use(routes);
Then replace the reference to fastifyRoutes with routes as shown below:
// app.js
await fastifyApp.register(routes);
At this stage, you can test the application once again to confirm that it works just fine as before.
We've now successfully moved all our routes to Fastify without much trouble. In the next section, we will shift our handling of static files from Express to Fastify.
Serving Static Files with Fastify
At the moment, the static JavaScript and CSS files (located in /src/public)
are being handled by the express.static middleware, according to this line in
app.js:
// app.js
expressApp.use("/static", express.static(path.join(__dirname, "public")));
We can replace this middleware with the @fastify/static plugin, which you can install through the command below:
npm install @fastify/static
Once installed, import it into the file and register it on the fastifyApp
instance:
// app.js
import fastifyStatic from '@fastify/static';

. . .

await fastifyApp.register(fastifyStatic, {
  root: path.join(__dirname, 'public'),
  prefix: '/static/',
});
Then remove the reference to express.static, and everything
should keep working the same as before (except that Fastify now handles
serving static files).
Replacing Express Middleware with Fastify Plugins
We've almost completed the migration to Fastify, but we still have some Express
bits to replace before removing the @fastify/express compatibility layer. In
this section, we'll replace the following middleware with the corresponding
Fastify alternatives:
- helmet -> @fastify/helmet.
- compression -> @fastify/compress.
- cors -> @fastify/cors.
Install the plugins through the command below:
npm install @fastify/helmet @fastify/cors @fastify/compress
In your app.js file, delete the following lines:
// app.js
import helmet from 'helmet';
import cors from 'cors';
import compression from 'compression';

. . .

expressApp.use(helmet());
expressApp.use(cors());
expressApp.use(compression());
Then add the following lines in the appropriate location:
// app.js
. . .
import fastifyCors from '@fastify/cors';
import fastifyHelmet from '@fastify/helmet';
import fastifyCompress from '@fastify/compress';

. . .

await fastifyApp.register(fastifyCors);
await fastifyApp.register(fastifyHelmet);
await fastifyApp.register(fastifyCompress);
. . .
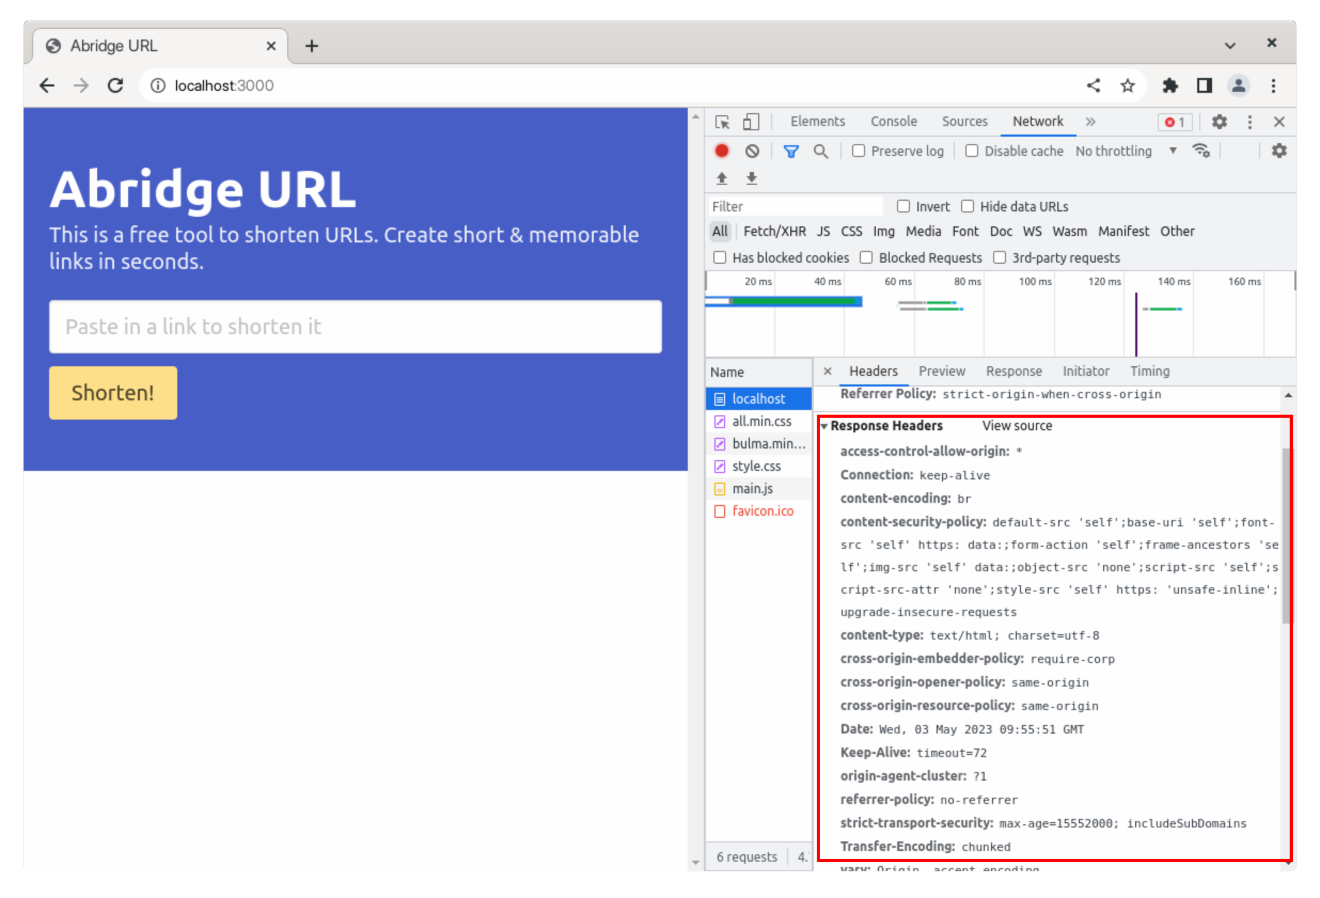
You can confirm that these work by making a request to the application root and inspecting the response headers through your browser DevTools.
At this point, we've replaced most of the Express middleware with Fastify plugins without affecting application functionality. What if you're unable to find a Fastify alternative to your Express middleware? You can use the techniques discussed in part 2 of this series to continue using the middleware even when the rest of the application has been migrated to Fastify.
In the next section, we'll turn our attention to the error handling middleware.
Error Handling in Fastify
In Express, error handling is done through middleware functions added
to an application's middleware stack. These functions have an additional err
parameter denoting the error being handled, and they are called when an error
occurs anywhere in the middleware stack or is thrown in a route
handler. The error handler for our Express app is located in
middleware/error.js:
// middleware/error.js
import { ValidationError } from "express-json-validator-middleware";
import logger from "../config/logger.js";

const errorHandler = (err, req, res, next) => {
  let statusCode = 500;
  let message = "internal server error";

  if (err instanceof ValidationError) {
    statusCode = 400;
    message = "validation error";
  } else {
    logger.error(err);
  }

  const response = {
    code: statusCode,
    message,
  };

  res.status(statusCode).send(response);
};

export default errorHandler;
We also install and import the express-async-errors package so that async errors are caught by this middleware instead of crashing the program.
Finally, we use AppSignal's expressErrorHandler middleware to automatically track unexpected errors:
// app.js
. . .
import 'express-async-errors';
import { expressErrorHandler } from '@appsignal/nodejs';
import errorHandler from './middleware/error.js';

. . .

expressApp.use(expressErrorHandler());
expressApp.use(errorHandler);
Let's begin migrating our error handling to Fastify by removing the above lines
in the app.js file. By default, Fastify automatically catches errors from both
synchronous and asynchronous routes, so no plugin replacement for
express-async-errors is needed. You can customize the default error-handling
behavior in Fastify by providing a custom error handler through the
setErrorHandler() method on a Fastify instance. The provided handler needs
to have the following signature:
function (error, request, reply) {}
Let's modify our existing Express error handler middleware so that it can handle Fastify errors instead:
// middleware/error.js
import logger from "../config/logger.js";
import { sendError } from "@appsignal/nodejs";

function errorHandler(err, req, reply) {
  let statusCode = 500;
  let message = "internal server error";

  if (err.code === "FST_ERR_VALIDATION") {
    statusCode = 400;
    message = "validation error";
    logger.info(err);
  } else {
    sendError(err);
    logger.error(err);
  }

  const response = {
    code: statusCode,
    message,
  };

  reply.code(statusCode).send(response);
}

export default errorHandler;
The code remains mostly the same, except that the function signature has been
modified, and schema validation errors are now detected differently. Also, the
sendError() method replaces expressErrorHandler as the way to track
unexpected application errors in AppSignal.
You may now set this function as the error handler for your routes using the
setErrorHandler() method:
// routes/routes.js
. . .
import errorHandler from '../middleware/error.js';

export default async function fastifyRoutes(fastify) {
  . . .

  fastify.setErrorHandler(errorHandler);
}
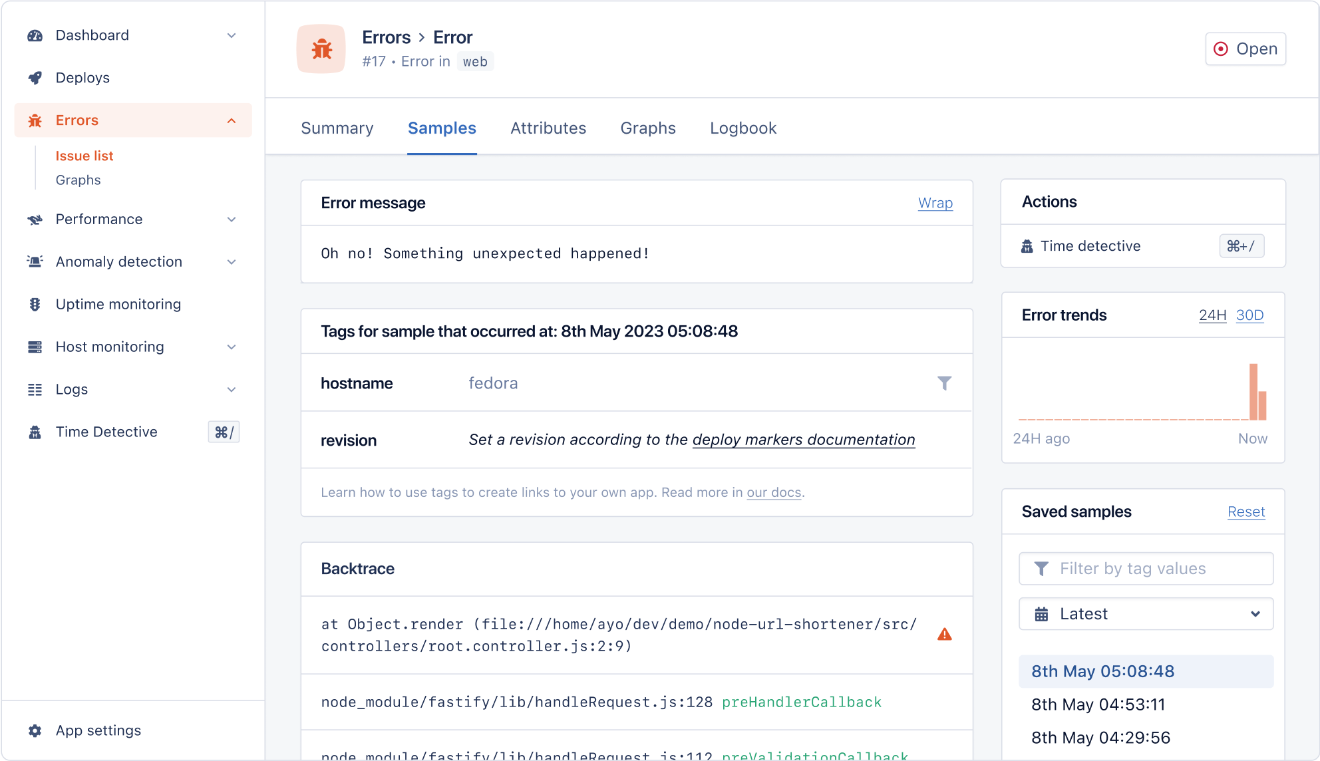
At this point, any error that occurs in your routes will be caught and processed
by the custom errorHandler you provided. They'll also be tracked in AppSignal
so that you can be notified quickly of any issues that occur in your Node.js
application.
You can learn more about error handling in Fastify's documentation and on AppSignal's error tracking page.
Replacing Winston Logging with Pino
Our Express application uses Winston and Morgan for logging HTTP requests.
Fastify comes with Pino by default, but logging must be enabled for it to work:
// app.js
const fastifyApp = Fastify({
  logger: true,
});
When Fastify logging is enabled, you'll notice that Pino logs appear alongside Winston logs when requests are sent to the server:
{"level":30,"time":1683531253228,"pid":782352,"hostname":"fedora","reqId":"req-2","res":{"statusCode":304},"responseTime":6.965402990579605,"msg":"request completed"}
{"level":30,"time":1683531253229,"pid":782352,"hostname":"fedora","reqId":"req-3","res":{"statusCode":304},"responseTime":4.585820972919464,"msg":"request completed"}
{"content_length":"0","level":"info","message":"GET /static/main.js 304 0 - 2.775 ms","method":"GET","path":"/static/main.js","response_time_ms":"2.775","status_code":304,"timestamp":"2023-05-08T07:34:13.229Z","user_agent":"Mozilla/5.0 (X11; Linux x86_64; rv:109.0) Gecko/20100101 Firefox/113.0"}
At this point, you can remove the requestLogger from the Express application
so that only Fastify logs remain. Go ahead and delete the following lines of
code from your app.js file:
// app.js
import requestLogger from "./middleware/requestLogger.js";

expressApp.use(requestLogger);
At this stage, we've completely migrated the Express application over to Fastify
so you can remove the express and @fastify/express packages as well:
// app.js

import express from 'express';
import fastifyExpress from '@fastify/express';
. . .

const expressApp = express();

. . .
await fastifyApp.register(fastifyExpress);
fastifyApp.use(expressApp);
Head to your
config/logger.js file, and replace winston with pino as shown below:
// config/logger.js
import pino from "pino";
import config from "./config.js";

const logger = pino({
  level: config.logLevel,
  formatters: {
    bindings: (bindings) => {
      return { pid: bindings.pid, host: bindings.hostname };
    },

    level: (label) => {
      return { level: label };
    },
  },
  timestamp: pino.stdTimeFunctions.isoTime,
});

export default logger;
Afterward, replace Fastify's default logger instance with the custom Pino logger:
// app.js
import logger from './config/logger.js';

. . .

const fastifyApp = Fastify({
  logger: logger,
});
At this point, all application logs are now produced through the same Pino instance, so the log formatting should be consistent:
{"level":"info","time":"2023-05-08T08:09:43.047Z","pid":920874,"host":"fedora","reqId":"req-1","req":{"method":"POST","url":"/shorten","hostname":"localhost:3000","remoteAddress":"127.0.0.1","remotePort":60582},"msg":"incoming request"}
{"level":"debug","time":"2023-05-08T08:09:43.058Z","pid":920874,"host":"fedora","msg":"https://github.com/nvim-telescope/telescope.nvim#themes shortened to mB5Ke86"}
{"level":"info","time":"2023-05-08T08:09:43.060Z","pid":920874,"host":"fedora","reqId":"req-1","res":{"statusCode":200},"responseTime":12.570792019367218,"msg":"request completed"}
Note that Fastify makes its logger available on the Server and Request types
so you can access it directly without importing from config/logger.js. For
example:
// controllers/url.controller.js
import Url from "../models/url.model.js";

async function shorten(req, reply) {
  const { shortID, destination } = await Url.findOrCreate(req.body.destination);

  req.log.debug(`${destination} shortened to ${shortID}`);

  reply.send({ shortID, destination });
}

async function redirect(req, reply) {
  const { shortID } = req.params;

  const { destination } = await Url.findOne({ shortID });

  req.log.debug(`redirecting /${shortID} to ${destination}`);

  reply.redirect(destination);
}

export default { shorten, redirect };
Learn more about logging in Fastify and how to customize the Pino logger.
Testing Your Application
We've successfully completed our migration from Express to Fastify! You may now remove all the Express-related packages from your project through the command below:
npm uninstall express body-parser express-async-errors helmet winston cors @fastify/express express-json-validator-middleware ajv-formats compression morgan
You can also remove some of the files that are no longer needed:
rm src/middleware/validator.js src/middleware/requestLogger.js
Afterward, ensure you thoroughly test your application to confirm that it's working as expected, ideally through automated tests that you've previously set up. However, since our application is small and we don't have any automated tests, manual testing will suffice:
Wrapping Up
Thank you for following along with this series on migrating from Express to Fastify. We've covered a lot of ground, and I hope you found it helpful in deciding whether to switch to Fastify and how to approach the migration process.
Fastify offers many additional features that we couldn't cover in this series, so check out the Fastify official documentation to learn more. Also, you can find all the code samples we used in this GitHub repository.
I hope this series has equipped you with the knowledge and skills to start building performant and scalable web applications with Fastify. If you have any questions or feedback, please don't hesitate to reach out.
Until next time, happy coding!
P.S. If you liked this post, subscribe to our JavaScript Sorcery list for a monthly deep dive into more magical JavaScript tips and tricks.
P.P.S. If you need an APM for your Node.js app, go and check out the AppSignal APM for Node.js.