
Have you ever heard of Node.js async hooks module? If the answer is no, then you should get familiar with it. Even though it’s new stuff (released along with Node.js 9) and the module is still in experimental mode, which means it’s not recommended for production, you should still get to know it a bit better.
In short, Node.js async hooks, more specifically the async_hooks module, provides a clear and easy-to-use API to track async resources in Node.js.
In its simplest form, the API can be accessed by simply typing the good old JavaScript require import:
const async_hooks = require('async_hooks');
Wait… but what do you mean by async resources? Well, a lot of stuff happens asynchronously within the JavaScript universe nowadays. When it comes to Node.js, then it's even more so.
However, the asynchronous nature we’re talking about here deals with the objects that Node.js creates (or allow us to create) that have an associated callback, regardless of how many times the callback may be called. There are many out there: Promises, the action of creating a server, timeouts, etc.
Remember that resources, as is the case with most languages, can be closed. Some of them are closed by the container, others by the language itself. So, your callback function may not even be called in the end. And that’s ok. AsyncHook doesn’t discriminate among these different scenarios.
This article was written to explore hooks a bit deeper and try to give you my overview on the subject, with some examples here and there to help digest the whole thing. Ready?
👋 As you're exploring async hooks, you might want to explore AppSignal's monitoring for Node.js as well. We provide you with out-of-the-box monitoring for Node.js Core, Express, Next.js, Apollo Server, node-postgres and node-redis.
API Usage
I tend to think of official documentation as being a bit harsh, not to mention complex at times. That’s why I usually go for traditional and friendlier blog posts.
Let’s take a look at the five available event functions provided by the Async Hooks API:
init: as the name suggests, it’s called when that specific async resource is initialized. Just for the record, at this point, we’ve already associated the hook with an async resource.beforeandafter: that’s very similar to the pre and post-execution of a function in ordinary languages. They’re called right before and after the resource executes, respectively.destroy: suggestive, isn’t it? Yes, it’s called whenever the resource is destroyed, no matter what happened to its callback function.promiseResolve: this is the Promise-related one. When your Promise gets itsresolvefunction called, then our hook will trigger this function.
Pretty straightforward. So, what about a basic example? Let’s see:
const myFirstAsyncHook = async_hooks.createHook({
  init,
  before,
  after,
  destroy,
  promiseResolve,
});
Yes, you must first create each one of the event functions before assigning them to the createHook function. Plus, the hook must be explicitly enabled:
myFirstAsyncHook.enable();
Ok, got it. But how about a more complete example? You’re right, let’s jump right into it:
const fs = require("fs");
const async_hooks = require("async_hooks");

// Sync write to the console
const writeSomething = (phase, more) => {
  fs.writeSync(
    1,
    `Phase: "${phase}", Exec. Id: ${async_hooks.executionAsyncId()} ${
      more ? ", " + more : ""
    }\n`
  );
};

// Create and enable the hook
const timeoutHook = async_hooks.createHook({
  init(asyncId, type, triggerAsyncId) {
    writeSomething(
      "Init",
      `asyncId: ${asyncId}, type: "${type}", triggerAsyncId: ${triggerAsyncId}`
    );
  },
  before(asyncId) {
    writeSomething("Before", `asyncId: ${asyncId}`);
  },
  destroy(asyncId) {
    writeSomething("Destroy", `asyncId: ${asyncId}`);
  },
  after(asyncId) {
    writeSomething("After", `asyncId: ${asyncId}`);
  },
});
timeoutHook.enable();

writeSomething("Before call");

// Set the timeout
setTimeout(() => {
  writeSomething("Exec. Timeout");
}, 1000);
This is an example that tracks the async execution of a timeout through the well-known native function setTimeout.
Before we go deeper into it, give a quick look at the first function, writeSomething. You may wonder why we’re creating a whole new function to write to the console if we already have a function for that…
Well, you can’t use any of the console’s functions to test async hooks simply because they’re also asynchronous, per se. So, this would generate an infinite loop since we’re providing an init event function below. This function would call a console’s log, which would trigger the init again and so on… infinitely.
That’s why we need our own “synchronous” log function.
Great, back to the code! Our async hook is provided with four functions: the init, before, after, and destroy. And, we’re also printing a message before the timeout and during its execution, so you get to see how things work linearly.
Run node index.js on your command line and you’ll get something like shown below:
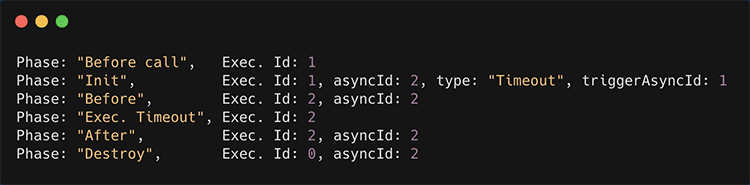
Watch how the hook perfectly tracks the phases, one by one. Sounds like an interesting way to track things, especially if you consider inputting the data to a monitoring tool, or perhaps even the log tracking tool you already use.
A Promise Example
Let’s see how our sample example performs under a Promise-based execution. Consider the following code snippet:
const calcPow = async (n, exp) => {
  writeSomething("Exec. Promise");

  return Math.pow(n, exp);
};

(async () => {
  await calcPow(3, 4);
})();
You may switch the previous setTimeout example with this one. Here, we have an async function that calculates the power of a number. The same function is being called within an async block. So far, we have two Promises being created by Node.js.
And here’s the log results:
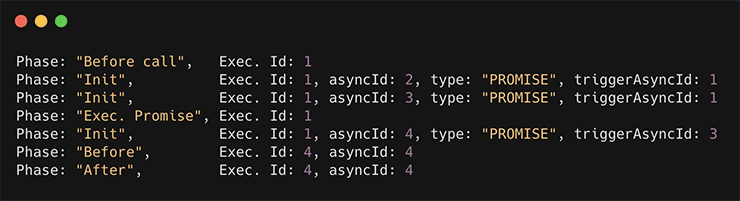
Curious… We’ve got two Promises, however, three calls to the init function were made. Don’t worry, this is due to some recent improvements on asynchronous execution performance that the Node.js team introduced in version 12. You can read more about this here.
Despite that, the execution went through as expected.
Profiling: Performance Hooks to the Rescue!
Another very interesting API provided by Node.js is the Performance measurement API and, since we’re talking about measuring stuff here, why not mix the power of both of them to see what we can collect?
This API, programmatically available as perf_hooks, allows us to get performance/user timeline metrics in a similar way to what the W3C Web Performance APIs do.
Combining it with the Async Hooks we can, for example, track how long our asynchronous functions took to complete. Let’s see another example:
const async_hooks = require("async_hooks");
const { performance, PerformanceObserver } = require("perf_hooks");

const hook = async_hooks.createHook({
  init(asyncId) {
    performance.mark(`init-${asyncId}`);
  },
  destroy(asyncId) {
    performance.mark(`destroy-${asyncId}`);
    performance.measure(
      `entry-${asyncId}`,
      `init-${asyncId}`,
      `destroy-${asyncId}`
    );
  },
});
hook.enable();

const observer = new PerformanceObserver((data) =>
  console.log(data.getEntries())
);
observer.observe({
  entryTypes: ["measure"],
  buffered: true,
});

setTimeout(() => {
  console.log("I'm a timeout");
}, 1200);
Since we’re only tracking the duration time of the execution, there’s no need for the intermediary event functions we’ve used before. init and destroy are
enough for this.
The performance API works by creating observers, in a similar way to what our async hooks does. However, you’ll have to explicitly mark the ids of each event whenever it starts and finishes. This way, when we call the API’s measure function, it’ll summarize the collected data and send it right away to our observer which, in turn, will log the entries for us.
Notice that, here, we’re making use of the console.log function twice. The first is harmless since it’s contained by the observer block execution. The second, however, is inside our setTimeout function, which means that it’ll produce different output in the end. An async inside another async.
These are the log results:
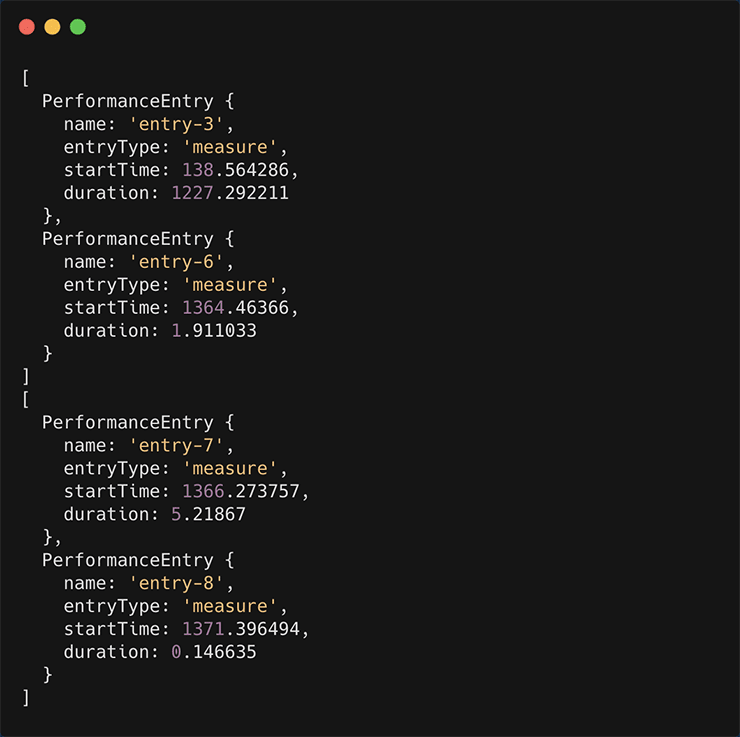
This example is not taking into account the differentiation between the event types. Here, we have a timeout and an async log operation taking place within the same measuring scenario.
However, for production purposes, it’s recommended that you create a more powerful mechanism to store the event types every time the init gets called, and check the store for its existence when the destroy function later gets called since, unfortunately, it doesn’t receive the type as a param.
The AsyncResource
Another helpful feature that comes within Async Hooks is the AsyncResource class. It is going to help you whenever you create your own resources for your frameworks or libraries.
It’s available by simply typing the following code:
const AsyncResource = require("async_hooks").AsyncResource;
This way, you can use it to instantiate a new object and manually define when each of its phases starts throughout your code. Take this example:
const resource = new AsyncResource('MyOwnResource');

someFunction(function someCallback() {
   resource.emitBefore();

   // do your stuff...

   resource.emitAfter();
});

someOnClose() {
   resource.emitDestroy();
}
That would be an example of a resource lifecycle, although its usage is much more recommended when creating your own resources when working with embedded bindings (like with C++) or dealing with worker threads. I’ll leave you with this great example from the official docs to simplify it.
Conclusion
As we said, that’s experimental. So be careful when going live with its features.
Since hooks are available only from Node.js 8 and on, you can consider migrating your Node.js version (which is, many times, a not so possible approach) or making use of alternative tools from the community, like the async-tracer, for example.
As usual, I cannot finish this piece without reiterating how important it is to go for a deep reading over the official docs. It’s free, it’s worth it!
P.S. If you liked this post, subscribe to our new JavaScript Sorcery list for a monthly deep dive into more magical JavaScript tips and tricks.
P.P.S. If you'd love an all-in-one APM for Node or you already know AppSignal, go and check out the AppSignal APM for Node.js.