
Coming from an HTTP-only background, message queues look very fascinating. Unlike HTTP, you can just push events to the queue and move on. After all, they're a big part of what makes async communication possible between microservices.
In this article, we'll take a look at Apache Kafka and how you can build a durable throttling layer with it.
Let's get started!
What We'll Cover
Here's what we'll go through in this post:
- Why use Kafka?
- The problem with normal consumption
- How to enable manual commits to throttle consumption
- Granular control with async queue
- Putting it all together
- Real-world applications
- Wrapping up
Prerequisites
To follow along with this tutorial, you will need:
- Working knowledge of building REST API with Express.js (Node.js version >= 16)
- Basic knowledge of Apache Kafka
- (Optional) AppSignal account (for application performance monitoring)
- A running MongoDB cluster on your Atlas account
This article contains a few code snippets. You can refer to the complete working code along with the getting started guide on GitHub.
Installing Kafka
You can skip this section if you have Apacha Kafka already installed on your machine. The complete quickstart is available in the official Kafka documentation. Here's what we need to do:
-
Download Kafka as indicated in step 1 of the documentation above.
-
Once installed, go to the downloaded Kafka folder. Your Kafka installation version might differ.
cd kafka_2.13-3.3.1/
- Run zookeeper and server by running these commands in separate terminal tabs. The commands must be run in the given order.
bin/zookeeper-server-start.sh config/zookeeper.properties
bin/kafka-server-start.sh config/server.properties
If one stops or exits the process, try to restart both. You should only proceed when both scripts are in a running state and there isn't an expiring session.
- Open a new tab in your terminal and create a test topic. We'll use this topic throughout the article.
bin/kafka-topics.sh --create --topic testTopic2 --bootstrap-server localhost:9092
To confirm if the topic has been successfully created, you can run the following command:
bin/kafka-topics.sh --describe --topic testTopic2 --bootstrap-server localhost:9092
You should have Apache Kafka running on localhost:9092 after following these steps. We can proceed to the next steps.
Setting up AppSignal for Node.js
This is an optional step. We're going to integrate AppSignal to monitor and learn more about our Node.js application. You need to set up an AppSignal account to follow this section.
We need two things to integrate AppSignal into our project:
- AppSignal application name. You can find this in the
config.jsfile under the "appName" field. I've created an app called "throttle-kafka-nodejs". - Your AppSignal API key, sourced as "APPSIGNAL_PUSH_API_KEY" from the ENV file.
You can find the AppSignal SDK in the src/appsignal.cjs file.
Let's now turn to why we should use Kafka in the first place.
Why Use Kafka for Node.js?
Apache Kafka provides a durable queue for your events with built-in reliability. It becomes pretty evident how Kafka can handle billions of events once you look at its architecture.
Durability
In contrast to other event queues where the events are lost upon consumption, this is not the case with Kafka. Unsurprisingly, that's one of its biggest selling points. Having access to the events even after consumption gives a sense of safety that is unparalleled.
The events are stored on disk and have a default retention period of 7 days. The retention period is configurable, and increasing it comes at the cost of a bigger disk.
Robustness
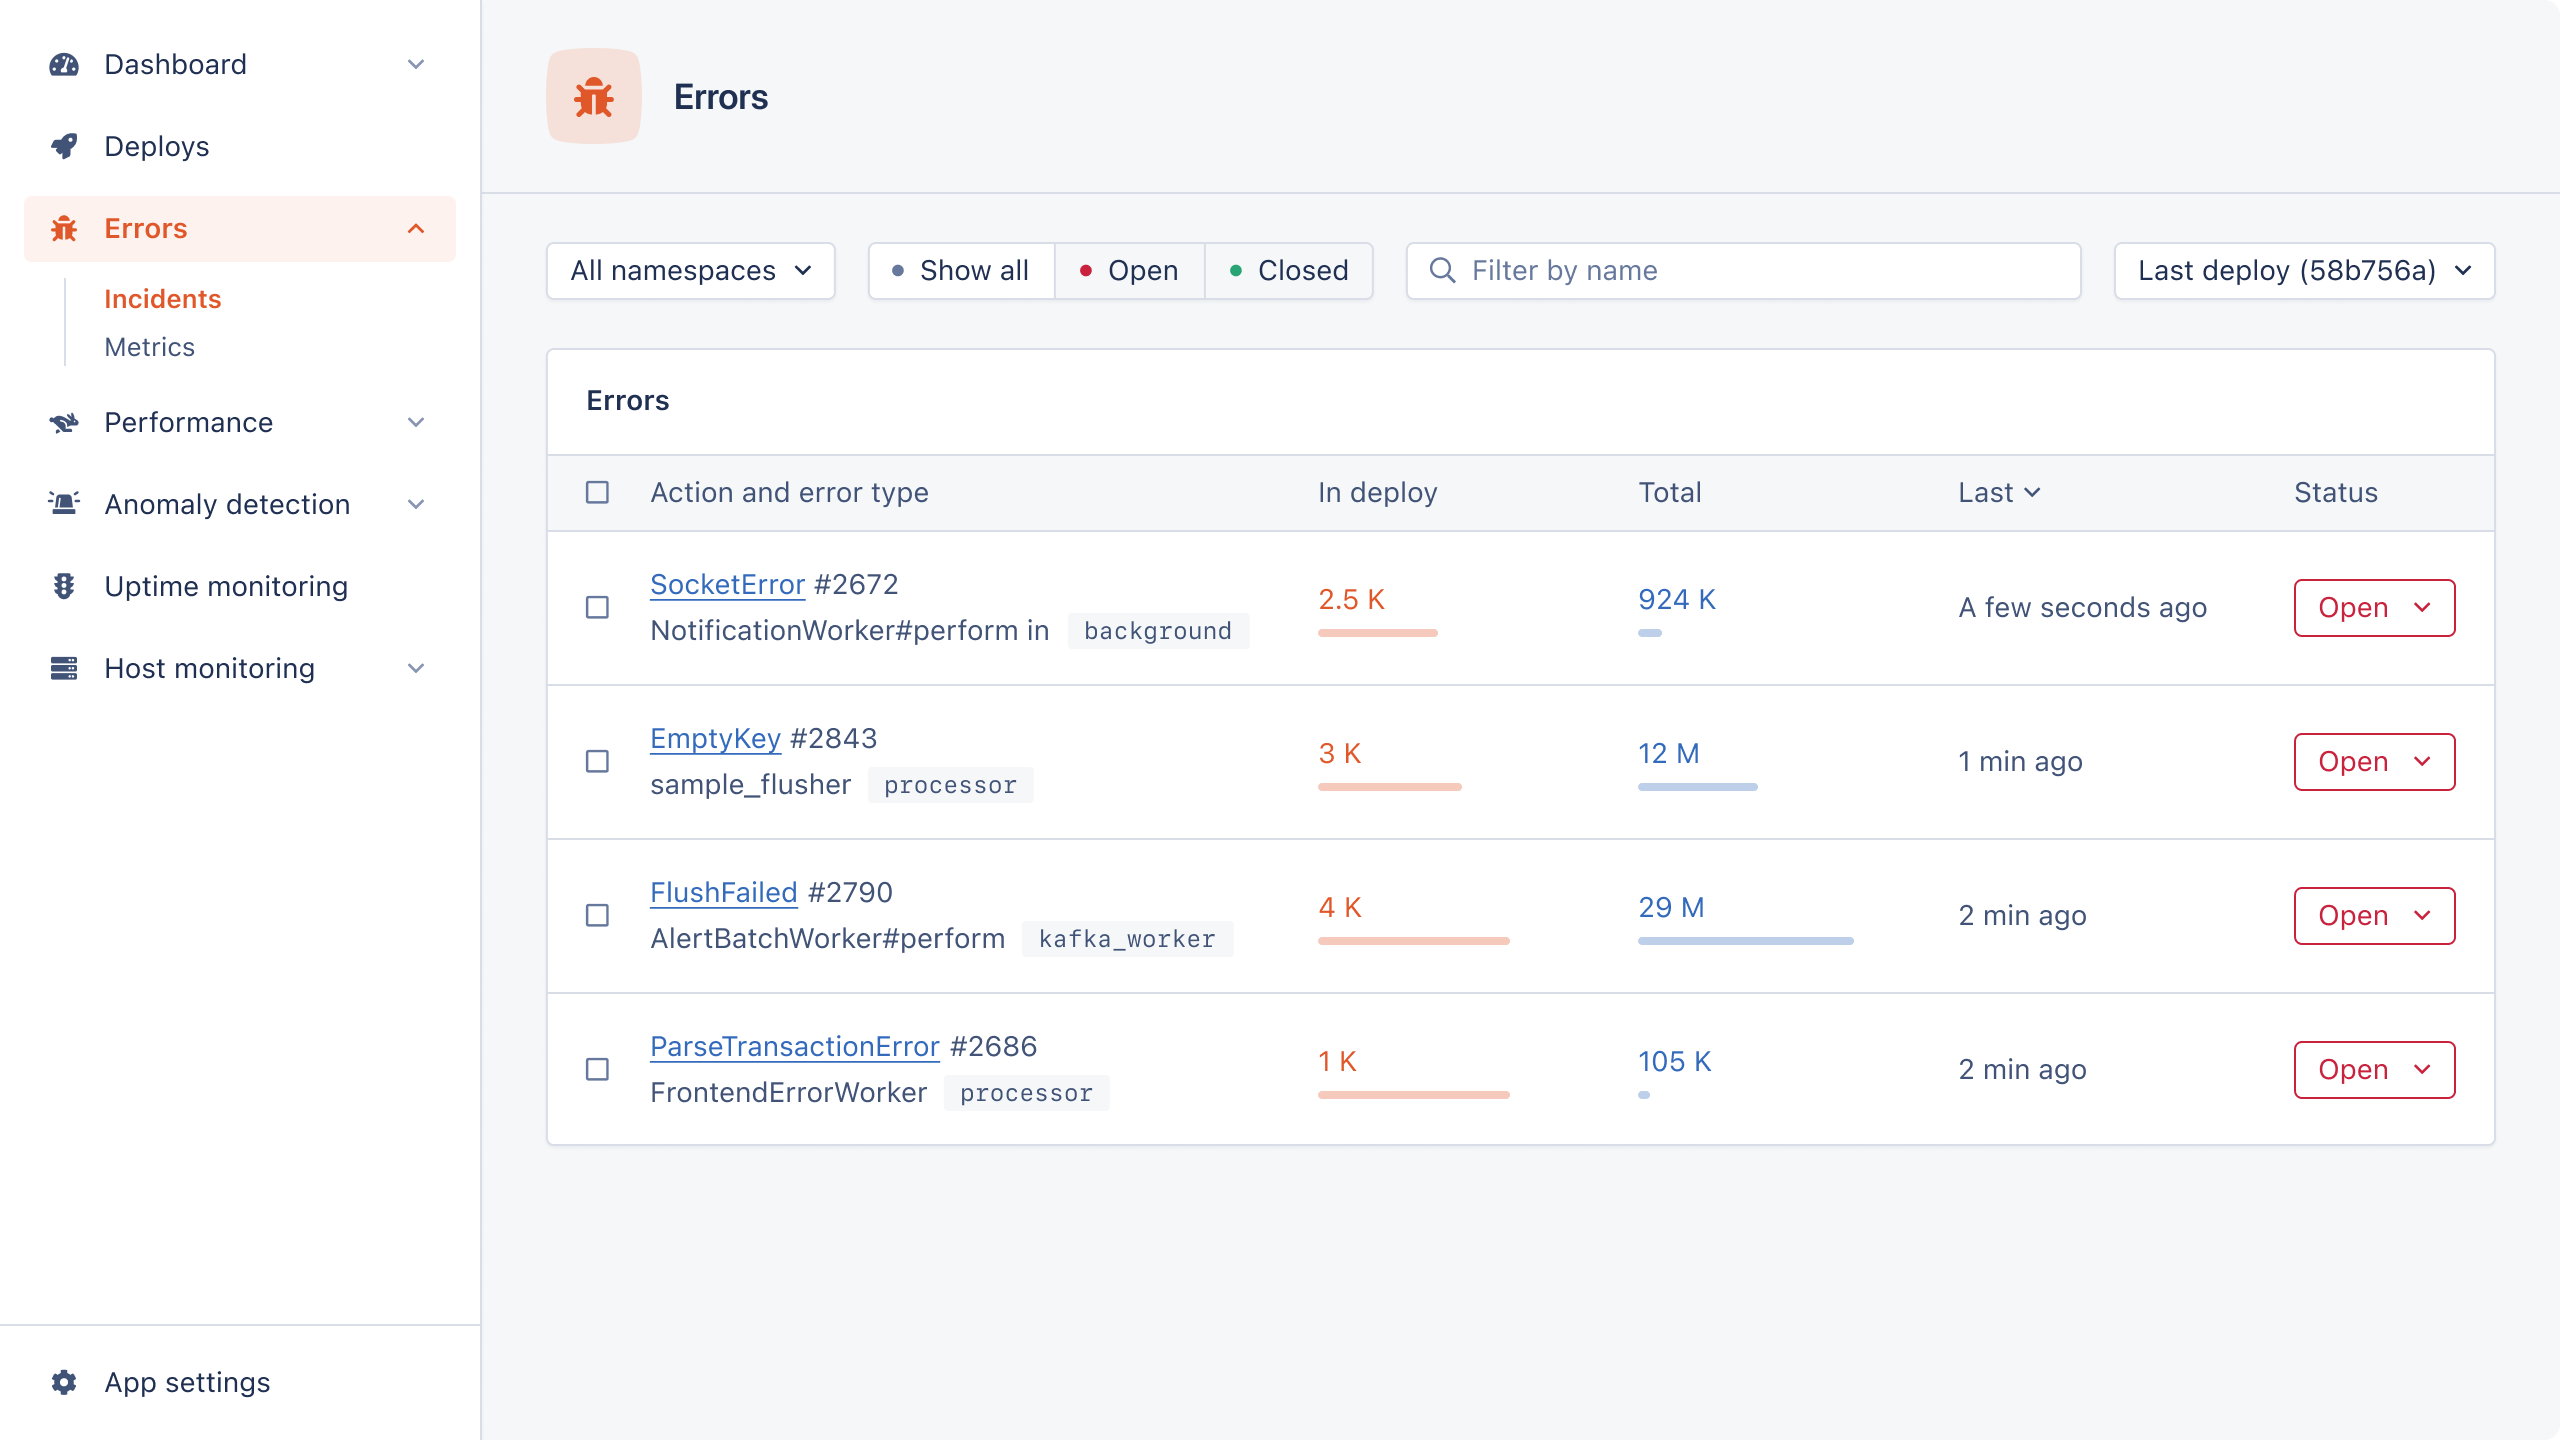
Kafka is designed with robustness in mind. Here's a simplistic generalized overview:
Brokers are nodes, a topic is a queue, and you can have various topics. Each topic is divided into a predetermined number of partitions (think database partitioning).
Writes go to the leader and are replicated to the followers on separate nodes (to ensure high availability or HA). Every partition is also copied to other nodes or brokers (configured via a replication factor setting) for HA.
When a broker dies, the broker leaders have to be re-elected on one of the live brokers. For instance, if broker 3 dies in our above-configured cluster, the leader for partition 3 will be elected from either broker 1 or broker 2. This happens by the cluster automatically and is not something you should worry about.
The Problem with Normal Consumption
Now that we know what makes Kafka one of the best candidates for the pub-sub mechanism, we should give it a run. We won't change any default configs just yet. We have a basic producer and a batch consumer set up in our Node.js application.
Let's push some events and see how our application performs:
router.post("/produce", async (req, res) => {
  try {
    const { events } = req.body;
    const producer = await kafkaProducer;
    const promises = events.map(async (event) => {
      const payload = {
        topic: config.kafka.topic,
        messages: [{ value: JSON.stringify(event) }],
      };

      return producer.send(payload);
    });

    await Promise.all(promises);

    return res
      .status(200)
      .json({ status: true, message: "Produced event successfully" });
  } catch (err) {
    return res
      .status(500)
      .json({ status: false, message: `Could not produce event: ${err}` });
  }
});
Since there's no way to stop consumption cycles, our application consumer will keep fetching the events in batches of the default size — 10MB. However, our application may be unable to process the events at the same rate. This causes the application to accumulate events in memory, making it prone to unexpected downtime due to resource starvation.
Moreover, autocommit is turned on by default in various Kafka Node.js client libraries, including KafkaJS. As the name suggests, all the events you fetch are committed automatically after a batch is successfully processed. But what if an application faces downtime in the middle of batch execution? The same events will be fetched again from Kafka in the next cycle, causing duplicate events.
But this isn't a bug, it's a feature. It ensures "at least once" semantics — see the documentation. Your use case determines your approach (e.g., autocommit in a financial system should be a no-go).
In this article, we're focusing on "exactly once" semantics and so want to avoid autocommit.
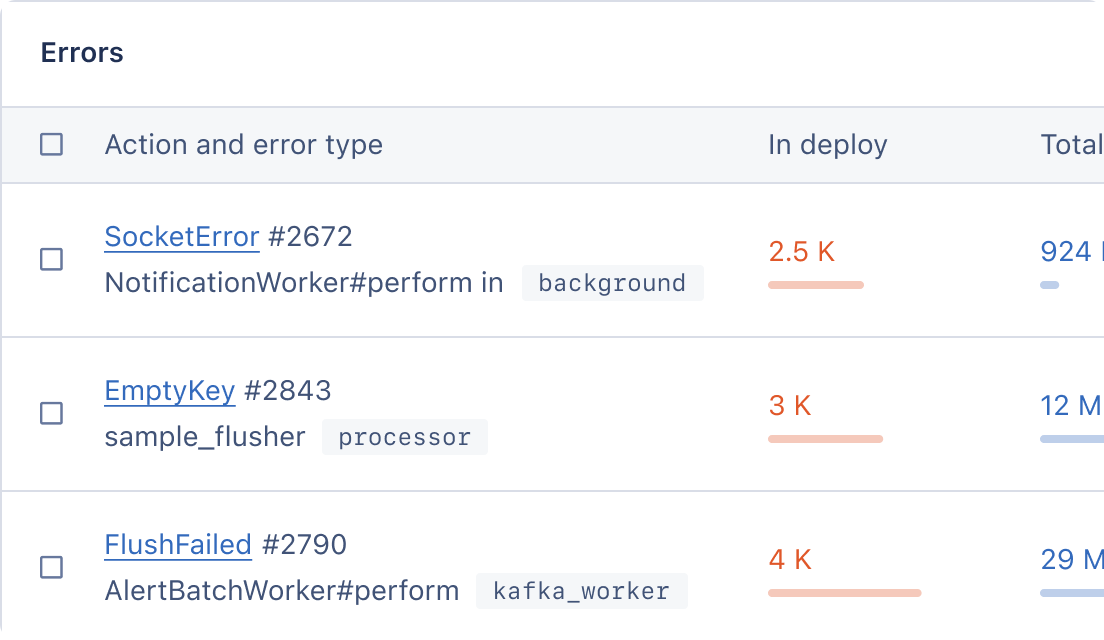
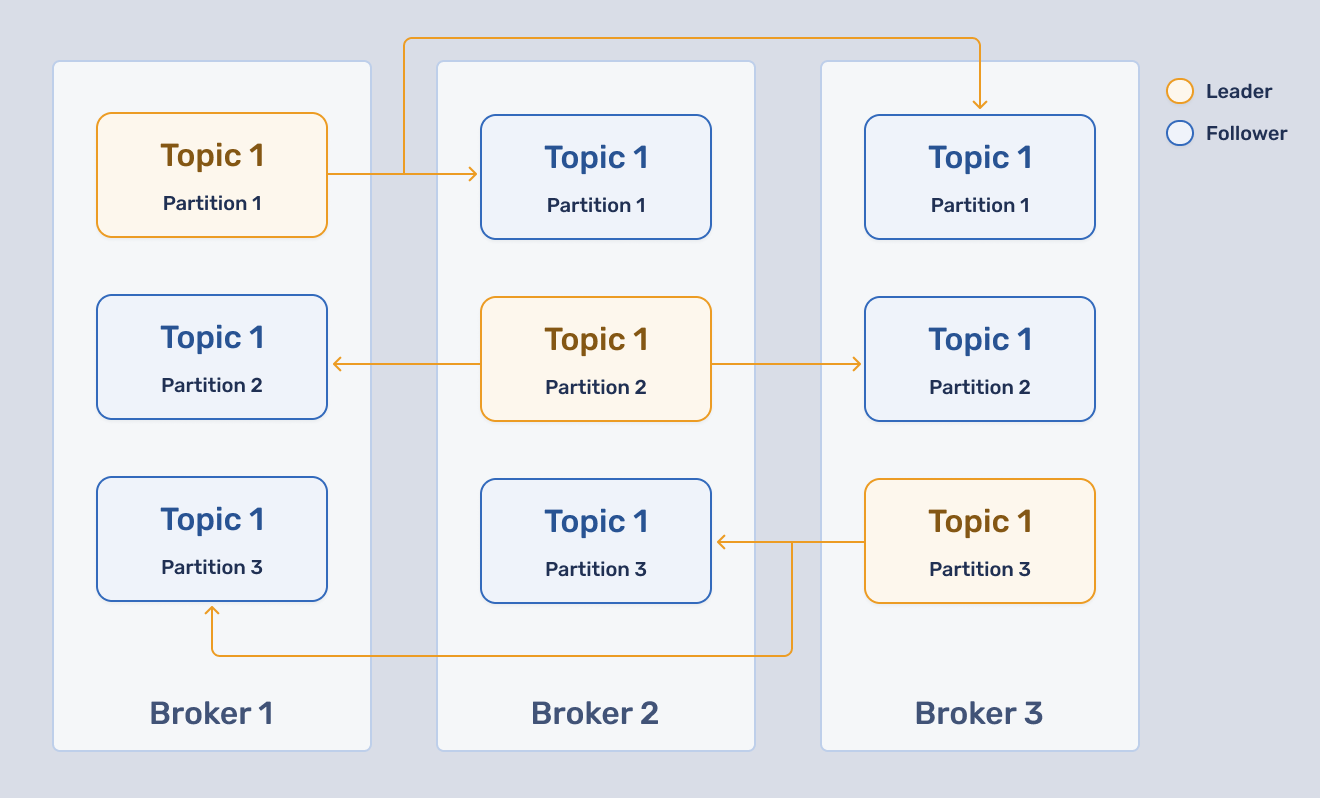
Monitoring the Anomalies in Our Node.js Application
The default batch limit of 10 MB might be too much (or too little) depending on the size of one event. Fetching events in excess can lead to an unbearable load on the consuming application. To observe and look out for anomalies, we're using AppSignal for Node.js.
We can analyze slow API endpoints and database queries for our application without setting up any configs or enabling integrations.
It's evident that our database is not having a good time. Let's improve this — time to reduce the batch size and switch to manual Kafka commits.
Manual Kafka Commits to the Rescue
Let's turn some knobs to ensure our application doesn't get overwhelmed.
We'll update our Kafka consumer to incorporate batching. We'll fetch a manageable batch size from Kafka and keep autocommit turned off, instead performing manual commits.
Here's our consumer function:
initConsumer: async (mongoClient) => {
  const consumer = KafkaJS.consumer({
    groupId: config.kafka.consumer,
    topic: config.kafka.topic,
    maxBytesPerPartition: config.kafka.maxBytesPerPartition,
    maxBytes: config.kafka.maxBytes,
    allowAutoTopicCreation: true,
  });

  await consumer.connect();

  consumer.on("consumer.commit_offsets", (event) => {
    console.info("✅ offset is committed");
  });

  await consumer.subscribe({ topic: config.kafka.topic, fromBeginning: false });

  await consumer.run({
    autoCommit: false,
    eachBatchAutoResolve: false,
    eachBatch: async ({
      batch,
      resolveOffset,
      heartbeat,
      commitOffsetsIfNecessary,
      uncommittedOffsets,
      isRunning,
      isStale,
      pause,
      resume,
    }) => {
      console.log("🛑 Pausing consumer group");
      pause([{ topic: config.kafka.topic }]);

      console.log(`🚧 Processing ${batch.messages.length} messages 🚧`);
      for (let message of batch.messages) {
        if (!isRunning() || isStale()) break;

        // Processing the event
        tracer.startActiveSpan(
          "insert | kafka event | SUCCEEDED",
          async (span) => {
            const Item = mongoClient.collection("items");

            // Send query data to AppSignal
            setCategory("query.mongodb");
            setBody(`Item.insertOne()`);
            setTag("operationType", "insert");

            // Save event data to DB
            await Item.insertOne(message);

            span.end();
          }
        );

        resolveOffset(message.offset);
        await heartbeat();

        commitOffsetsIfNecessary([message.offset]);
      }

      console.log("🟢 Resuming consumption for next batch");
      consumer.resume([{ topic: config.kafka.topic }]);
    },
  });
};
Let's run through this step-by-step:
- We've explicitly set
fetchMaxBytesand turned off autocommit. - Upon successful execution, we mark the event as processed by invoking
commitOffsetsIfNecessarymanually (this was automated earlier). - Once the events are committed to offset, we resume consumption.
- The commits are happening after processing every message. This way, we don't wait for the whole batch to finish processing before a commit can happen.
With these changes, we've improved the reliability of the pub-sub setup through manual commits and smaller batches. Let's explore how we can improve this further in the next section.
Granular Control with Async Queue in Kafka
As you might've noticed, we specify the batch size, not the number of events. In fact, the number of events we get in a batch is completely dependent on the size of one individual event. This leaves room for unwanted surprises. We don't want our application to get burdened with more events than it can process.
Welcome, async queue!
We will build a second throttling layer with async queue. With this queue, our application will only process a set number of events at once. The number is specified by the concurrency parameter.
Let's understand with an example.
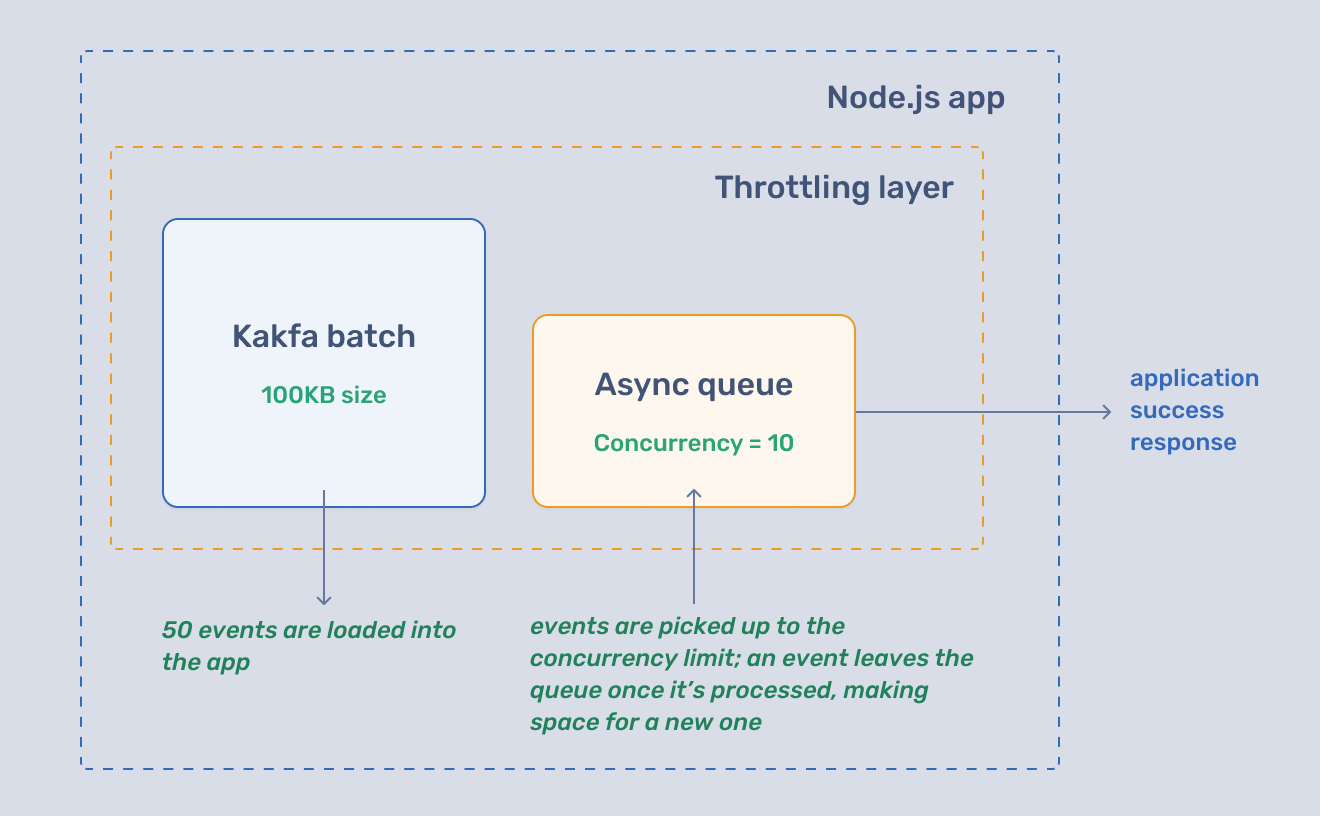
The second throttling layer lets us specify the exact number of events we want to process concurrently. Here's the updated consumer code:
initConsumer: async (mongoClient) => {
  const concurrentQueue = async.queue(async (queueData) => {
    const data = JSON.parse(queueData.value);
    console.time(`${data.hash} took`);
    console.log("processing in queue: ", data);

    // AppSignal event capturing, can comment if throttling has unexpected behaviour
    tracer.startActiveSpan("insert | kafka event | SUCCEEDED", async (span) => {
      const Item = mongoClient.collection("items");

      // Send query data to AppSignal
      setCategory("query.mongodb");
      setBody(`Item.insertOne()`);
      setTag("operationType", "insert");

      // Save event data to DB
      await Item.insertOne(data);

      console.timeEnd(`${data.hash} took`);

      span.end();
    });
  }, config.kafka.queueConcurrency);

  const consumer = KafkaJS.consumer({
    groupId: config.kafka.consumer,
    topic: config.kafka.topic,
    maxBytesPerPartition: config.kafka.maxBytesPerPartition,
    maxBytes: config.kafka.maxBytes,
    allowAutoTopicCreation: true,
  });

  // Connect to the consumer group
  await consumer.connect();

  consumer.on("consumer.commit_offsets", (event) => {
    console.info("✅ offset is committed");
  });

  // Subscribe to the topic
  await consumer.subscribe({ topic: config.kafka.topic, fromBeginning: false });

  // Run the consumer
  await consumer.run({
    autoCommit: false, // This is turned off since we're doing manual commits
    eachBatchAutoResolve: false,
    eachBatch: async ({
      batch,
      resolveOffset,
      heartbeat,
      commitOffsetsIfNecessary,
      uncommittedOffsets,
      isRunning,
      isStale,
      pause,
      resume,
    }) => {
      console.log("🛑 Pausing consumer group");
      pause([{ topic: config.kafka.topic }]);

      let offsets = [];
      console.log(`⬇️ Fetched ${batch.messages.length} messages from batch`);
      for (let message of batch.messages) {
        if (!isRunning() || isStale()) break;

        // Process the event
        concurrentQueue.push(message);

        offsets.push(message.push);

        resolveOffset(message.offset);
        await heartbeat();
      }

      // Handler for draining queue
      // Resumes the consumer to fetch next batch only when concurrentQueue is empty
      concurrentQueue.drain(function () {
        commitOffsetsIfNecessary(offsets);
        console.log("🟢 Resuming consumption for next batch");
        consumer.resume([{ topic: config.kafka.topic }]);
      });
    },
  });

  process.on("drainQueue", concurrentQueue.drain);
};
We are now fetching a batch from Kafka and pushing it to the queue. The queue makes sure only a predetermined number of events get processed concurrently.
Putting It All Together
With our updated pub-sub setup, let's analyze how the events are processed. We're producing a total of 10 events where the batch size is set to 1 KB and queue concurrency is 2.
initConsumer: async (mongoClient) => {
  const concurrentQueue = async.queue(async (queueData) => {
    const data = JSON.parse(queueData.value);
    console.time(`${data.hash} took`);
    console.log('processing in queue: ', data);

    // AppSignal event capturing, can comment if throttling has unexpected behaviour
    tracer.startActiveSpan('insert | kafka event | SUCCEEDED', async (span) => {
      const Item = mongoClient.collection('items');

      // Send query data to AppSignal
      setCategory('query.mongodb');
      setBody(`Item.insertOne()`);
      setTag('operationType', 'insert');

      // Save event data to DB
      await Item.insertOne(data);

      console.timeEnd(`${data.hash} took`);

      span.end();
    });
  }, config.kafka.queueConcurrency);

  const consumer = KafkaJS.consumer({
    groupId: config.kafka.consumer,
    topic: config.kafka.topic,
    maxBytesPerPartition: config.kafka.maxBytesPerPartition,
    maxBytes: config.kafka.maxBytes,
    allowAutoTopicCreation: true,
  });

  // Connect to the consumer group
  await consumer.connect();

  consumer.on('consumer.commit_offsets', (event) => {
    console.info('✅ offset is committed');
  });

  // Subscribe to the topic
  await consumer.subscribe({ topic: config.kafka.topic, fromBeginning: false });

  // Run the consumer
  await consumer.run({
    autoCommit: false, // This is turned off since we're doing manual commits
    eachBatchAutoResolve: false,
    eachBatch: async ({
      batch,
      resolveOffset,
      heartbeat,
      commitOffsetsIfNecessary,
      uncommittedOffsets,
      isRunning,
      isStale,
      pause,
      resume,
    }) => {
      console.log('🛑 Pausing consumer group');
      pause([{ topic: config.kafka.topic }]);

      let offsets=[];
      console.log(`⬇️ Fetched ${batch.messages.length} messages from batch`);
      for (let message of batch.messages) {
        if (!isRunning() || isStale()) break;

        // Process the event
        concurrentQueue.push(message);

        offsets.push(message.push);

        resolveOffset(message.offset)
        await heartbeat();
      }

      // Handler for draining queue
      // Resumes the consumer to fetch next batch only when concurrentQueue is empty
      concurrentQueue.drain(function() {
        commitOffsetsIfNecessary(offsets);
        console.log('🟢 Resuming consumption for next batch');
        consumer.resume([{ topic: config.kafka.topic }]);
      });
    },
  });


  process.on('drainQueue', concurrentQueue.drain);
},


getProducer: async () => {
  const producer = KafkaJS.producer({
    allowAutoTopicCreation: false
  });

  producer.on('producer.connect', (event) => {
    console.info('Kafkajs producer connection', { extra: event });
  });
  producer.on('producer.disconnect', () => {
    console.error(new Error('Kafkajs producer disconnected'));
  });
  await producer.connect();
  return producer;
}
Here's the output of the above code:
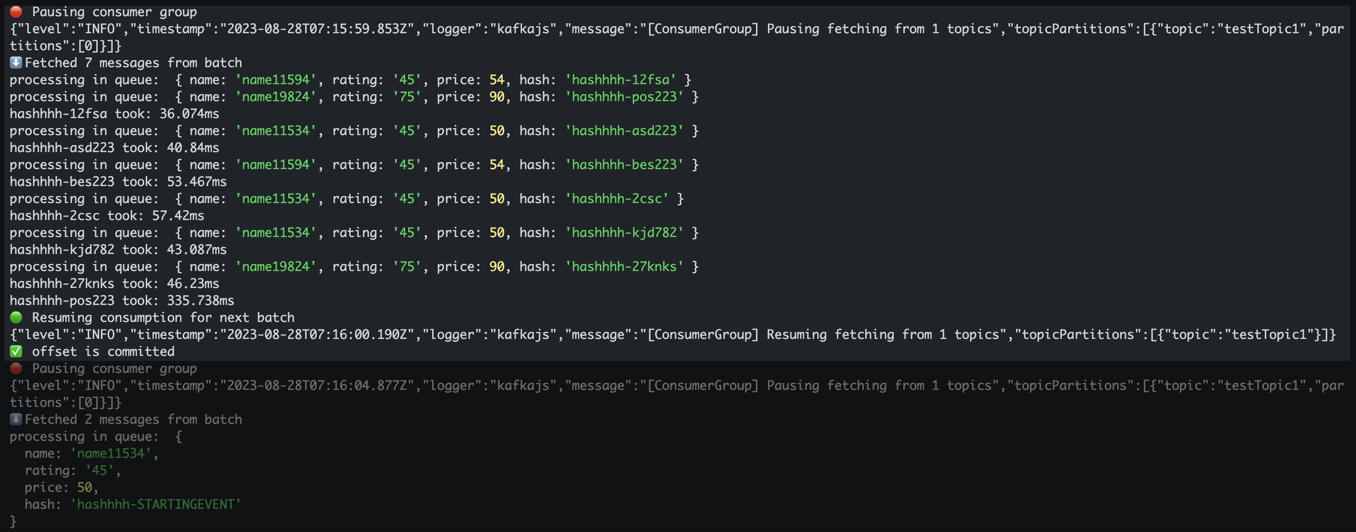
Note that we produced 10 events, but we're only focusing on one of the fetch cycles that pulled 7 events. We can confirm a few things by studying the above output:
- Batched consumption is working as expected. Consumption is paused after a batch is fetched and is only resumed once the batch is completely processed.
- Our second throttling layer (i.e., queue) only processes two events at once. As soon as one of the two is successfully processed, another event is picked from the fetched batch for processing.
Real-World Kafka for Node Applications
Kafka pub-sub is widely used for a variety of use cases across the industry, such as:
- In an e-commerce store, to update inventory and send stock refresh notifications to users.
- To send user events to a post-processor for lazy insertions into an analytics database.
- To build an audit trail pipeline where any modifications to an entity will be pushed to a topic and consumed by an audit service.
This is one of the reasons that companies like Uber, LinkedIn, Twitter, Netflix, PayPal, and many more use Apache Kafka.
Wrapping Up
In this post, we explored how to batch Kafka events with manual pause-resume functionality to build a scalable Kafka pub-sub pipeline. We talked about autocommit and how keeping it on isn't good for "exactly once" semantics. We also added a queue for granular control over a batch of events and consumed it at our own pace.
This mechanism of throttling Kafka enables your Node.js application to handle incoming load more gracefully and prevents choking of resources, thus promoting scalability. There's no one-size-fits-all solution; you can always customize the pipeline according to your needs and goals.
Happy coding!
P.S. If you liked this post, subscribe to our JavaScript Sorcery list for a monthly deep dive into more magical JavaScript tips and tricks.
P.P.S. If you need an APM for your Node.js app, go and check out the AppSignal APM for Node.js.