
In this post, we'll explain what server-side rendering (SSR) is and how it's different from the usual way websites work. We will run you through how to use SSR with Next.js, React, and TypeScript step-by-step.
By the end, you'll know how SSR can make websites faster and better.
Understanding Server-side Rendering (SSR)
Server-side rendering (SSR) is an important concept in modern web development that fundamentally changes how web pages are delivered. Let’s dive into its core principles and how they differ from the conventional approach known as client-side rendering (CSR).
Introduction to SSR
Server-side rendering involves generating the final HTML of a web page on a server before sending it to a user's web browser. When you request a web page, the server processes the data, renders the page, and sends a complete HTML document to the user. This HTML is immediately visible and functional, even before any JavaScript executes.
SSR significantly reduces the time users take to see and interact with a web page because they don't have to wait for JavaScript to load and execute before content is displayed.
SSR Vs. Client-side Rendering (CSR)
In client-side rendering (CSR), the initial HTML page sent to the user's browser is relatively minimal and often referred to as the shell or skeleton of the webpage. It mainly contains the page structure and references to JavaScript and CSS files in appropriate tags.
The browser downloads these JavaScript files, executes them, and then dynamically renders the page content based on the data fetched from an API or other sources. JavaScript frameworks like React, Angular, or Vue are typically used for this purpose.
Let's now take a closer look at some of the benefits of SSR.
Benefits of Server-side Rendering
SSR can significantly enhance the performance and user experience of web applications by reducing page load times, improving SEO and the user experience, and giving an accessibility and performance boost.
Reduced Initial Page Load Time
SSR minimizes initial page load times because the server sends a fully pre-rendered HTML page to your browser (unlike in CSR, where the browser needs to fetch JavaScript files.)
As a result, you can see and interact with a web page much faster, for a more seamless experience. Reduced load times are particularly critical for retaining user engagement and satisfaction.
Better SEO
Search engines like Google and Bing use web crawlers to index and rank web pages. These crawlers rely on the HTML content of a page to understand its structure and content. In SSR, since the server sends fully pre-rendered HTML to the client, search engine crawlers can easily access and index the content.
This means that your website's pages are more likely to be properly indexed and ranked in the search engine results pages (SERPs), which can increase organic traffic. SSR is a valuable tool for web developers and businesses aiming to boost their online visibility.
Enhanced User Experience
Server-side rendering is a game-changer for users, especially those on slower networks and older devices. The initial page content is immediately visible and functional, even before any JS is executed. It reduces the frustration of waiting for content to load and improves the perception of your website's speed and reliability.
This, in turn, can lead to higher user engagement and lower bounce rates.
Accessibility and Performance Boost
The pre-rendered HTML sent by the server ensures that content is immediately accessible to all users, including those with disabilities who rely on assistive technologies.
We've touched on the advantages of SSR, so let's get stuck into our SSR project.
Implementing Server-side Rendering with Next.js
Now we'll provide a step-by-step guide to implement SSR using Next.js, React, and TypeScript.
You can also follow along with the code in this Github repo.
Next.js and TypeScript Project Setup
- Install Node.js and npm: Ensure you have Node.js and npm installed on your development machine.
- Create a project
Use the following commands to create a new Next.js project with TypeScript:
npx create-next-app ssr-app
Keep the default selection during the creation wizard.
- Navigate to the project directory: Change your working directory to the newly created project folder.
cd ssr-app
- Start the development server to see your initial Next.js application in action.
npm run dev
Your Next.js project with TypeScript is now set up and running at http://localhost:3000.
SSR-Enabled Components in Next.js
The default rendering mechanism in Next.js is server components, which allow for automatic server-side rendering without requiring configuration changes. Additionally, you have the flexibility to utilize client components when the need arises.
Three different server-rendering strategies are available: static rendering, dynamic rendering, and streaming.
Static Rendering
Routes are rendered at build time by default. The resulting output can be cached and distributed through a Content Delivery Network (CDN), benefiting both client requests and user interactions.
Static rendering is best used when a route has information that doesn't depend on the user and can be figured out during the build — for example, blog posts that don't change or sales pages.
Dynamic Rendering
Routes are dynamically rendered for each user upon their request.
Dynamic rendering is useful when a route contains data tailored to a user or information that can only be known at request time, such as cookies or the URL's search parameters.
Within the context of dynamic rendering, a key element to understand is the role of dynamic functions. They enable Next.js to dynamically render the entire route when certain conditions are encountered (such as dynamic data requests).
Here are some examples of dynamic functions:
searchParams: If you use the Pages prop, the page undergoes dynamic rendering precisely when the request is initiated.cookies()andheaders(): These functions trigger dynamic rendering when employed within a server component, so content is generated at the exact moment of the request.useSearchParams(): This bypasses static rendering in client components. Instead, it displays all client components up to the nearest parent Suspense boundary on the client side.
You should wrap the Client Component using useSearchParams() within a <Suspense/> boundary, so that any client components located above it are drawn statically.
Streaming
Streaming is a technique used to enhance the user experience by rendering parts of a web page as soon as they become available, instead of waiting for the entire page to load.
This technique can be particularly beneficial for improving initial page loading performance and rendering UI components that depend on slower data fetches. In the context of Next.js, streaming is built into the Next.js App Router by default.
For example, if you have a product page with customer reviews fetched from an external API, you can use streaming to display product details and other UI components immediately, while the reviews are fetched in the background.
Now let's see how we can build an SSR-enabled component.
Create a Simple SSR-enabled Component
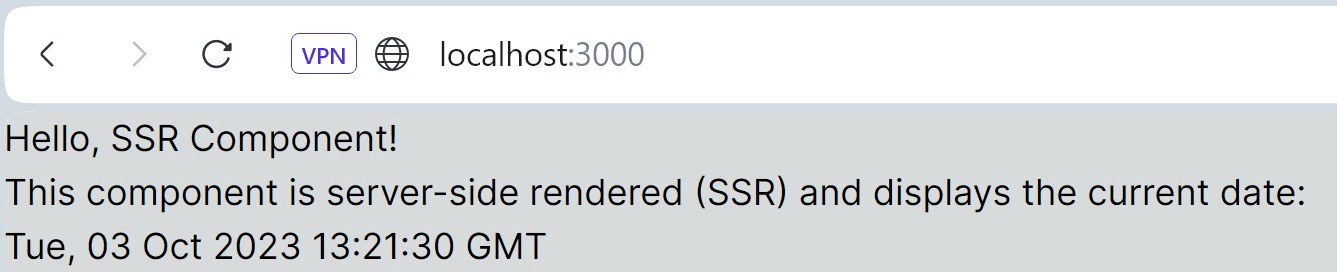
In your project folder, create a new component named SimpleSSRComponent in the app/page.tsx file (you can clear any existing code in this file):
export default function SimpleSSRComponent() {
  const currentDate = new Date().toUTCString();
  const greeting = "Hello, SSR Component!";

  return (
    <div>
      <h1>{greeting}</h1>
      <p>
        This component is server-side rendered (SSR) and displays the current
        date:
      </p>
      <p>{currentDate}</p>
    </div>
  );
}
Here's how that looks:
To leverage SSR effectively, you'll need to structure your components appropriately:
- Organize your components into reusable pieces. Ensure that the components you intend to render on the server are React functional components.
- Be mindful of client-side specific code, such as window or document references, which may not be available during server-side rendering. Conditionally include such code only when rendering on the client.
Data Fetching in Next.js and React
Next.js and React make it easy to fetch data from the internet in your web applications. You can control how data is temporarily stored and how often it's checked for updates when you fetch it on the server.
If you request the same data more than once while building your web page, your previous results are remembered.
To fetch data during server-side rendering, Next.js internally uses the native fetch. Here is how to use fetch in your previously created SimpleSSRComponent.tsx component:
async function fetchData() {
  const res = await fetch("https://jsonplaceholder.typicode.com/posts");

  if (!res.ok) {
    throw new Error("Failed to fetch data");
  }

  const jsonData = await res.json();
  return jsonData;
}

export default async function SimpleSSRComponent() {
  const currentDate = new Date().toUTCString();
  const greeting = "Hello, SSR Component!";

  const data = await fetchData();
  return (
    <div>
      <h1>{greeting}</h1>
      <p>
        This component is server-side rendered (SSR) and displays the current
        date:
      </p>
      <p>{currentDate}</p>
      <h2>Data Fetching Example (Server Component)</h2>
      <ul>
        {data.map((item: any) => (
          <div style={{ marginBottom: "20px" }} key={item.id}>
            {" "}
            <b>
              {item.id}. {item.title}
            </b>
            <p>{item.body}</p>
          </div>
        ))}
      </ul>
    </div>
  );
}
By default, data from fetch is cached at build time or request time, and cached data is served from the next requests onwards. To bypass the cache on every request, you can use the no-store filter in the fetch request, as shown below.
const res = await fetch("https://jsonplaceholder.typicode.com/posts", {
  cache: "no-store",
});
There might be situations where you need to purge or invalidate the cache to update it with new data. You can use a time-based cache with a revalidate filter.
// This will revalidate the posts data at most every hour
const res = await fetch("https://jsonplaceholder.typicode.com/posts", {
  next: { revalidate: 3600 },
});
Routing Implementation in Next.js
Next.js has built-in routing that automatically maps files in your app directory to URLs, so you can create routes without manual configuration.
For example, an app/profile/page.tsx file corresponds to the /profile route.
// `app/profile/page.tsx` is the UI for the `/profile` URL
export default function Page() {
  return <h1>Hello, This is your profile page!</h1>;
}
Here's how that looks:

Dynamic Routing
You can use dynamic segments if you have data that changes and want to create routes without knowing the specific segment names beforehand. These segments can be populated when a request is made or prepared in advance during the build process, and is also called dynamic routing.
Dynamic routing simplifies handling various content with similar structures. Consider an e-commerce website where you sell different products. Creating a unique file for each product is impractical if they all share a common format, including a name, description, and price.
Use dynamic routing in Next.js with square brackets — [] — for a single file structure that covers all products. For example:
- Create a dynamic route like
app/products/[productId]/page.tsxto handle a range of products. - When a user navigates to
/products/laptop, you can extract theproductIdas a parameter from the URL. - With this
productId(e.g., "laptop"), you can fetch and display the specific details of a laptop.
In this way, dynamic routing helps manage content efficiently, even if you have hundreds or thousands of different products. Each product uses the same file structure, but displays unique product details based on the parameter provided in the URL.
Using the Link Component in Next.js
To enable seamless navigation between pages in your Next.js application, use the Link component.
Here's how:
import Link from "next/link";
export default function Page() {
  return (
    <div>
      <h1>Hello, This is your profile page!</h1>
      <p>Click on the link below to navigate to the Home page:</p>
      <Link href="/">Go to Home Page</Link>
    </div>
  );
}
And this is how it looks:

In this example, we import the Link component from Next.js and create a link to the / page (home page).
Let's now turn our attention to styling SSR components.
Styling in a Server-rendered Environment
Styling in a server-rendered context requires careful consideration:
- Consider using CSS-in-JS libraries like styled-components or Emotion. These libraries allow you to write CSS directly in your JavaScript or TypeScript components so styles are applied consistently, whether on the server or the client.
- For global styles, create
app/global.cssand include it in the layout.tsx. Styles will be available across the entire layout. - Scoped styles can be achieved by creating styles within the component file. CSS-in-JS libraries provide mechanisms for encapsulating styles to prevent conflicts.
- Consider serving critical CSS inline within your HTML so initial styles load quickly.
Best Practices and Tips
Finally, let's take a look at some of the best practices you should follow when working with SSR applications.
Optimal Use Cases for SSR Implementation
Server-side rendering is a powerful technique, but should be used judiciously. Here are some optimal use cases for SSR implementation:
- Content-heavy websites: Websites with a significant amount of content, such as blogs, news sites, or e-commerce platforms, can greatly benefit from SSR. Pre-rendering content ensures faster page loads and better SEO for content-driven websites.
- Authentication and user-specific data: SSR can be used for pages that require authentication or display user-specific data. While the initial page load can be pre-rendered, client-side interactions can still be used to enhance the user experience after authentication.
- Progressive enhancements: SSR can be used as part of a progressive enhancement strategy. Start with server-rendered content for broad accessibility, and then enhance the user experience with client-side interactivity as needed.
Code Splitting Techniques for Next.js Performance Optimization
Next.js has built-in support for code splitting, a technique for optimizing web application performance by loading only the necessary JavaScript code for a particular page, rather than sending the entire bundle to the client. This can significantly improve page load times, especially for larger applications.
Let's say you have a Next.js application with two pages: Profile and About.
Your project might look something like this:
app/
    profile/page.tsx // Profile page
    about/page.tsx // About page
Next.js automatically generates separate JavaScript bundles for each page. So when a user visits the Profile page, only the JavaScript code related to that page will be loaded. Similarly, when they visit the About page, only the code for that page will be loaded.
Implement lazy loading for non-crucial components in the initial page view. Load them asynchronously when the user interacts with the page, reducing the initial payload size.
You can also use dynamic imports to specify explicit code splitting for certain components or modules. For example:
import dynamic from "next/dynamic";

const ComponentProducts = dynamic(() => import("../components/Products"));
const HomePage = () => (
  <div>
    <h1>Welcome to the Home page</h1>
    <ComponentProducts />
  </div>
);

export default HomePage;
Performance Monitoring and Optimization Strategies
Here are some strategies to consider for maintaining a fast and responsive SSR application:
- Performance budgets: Establish performance budgets to define acceptable limits for metrics like page load time, time to interact, and first contentful paint.
- Server load testing: Test your server's capacity to handle the load that SSR generates. Perform load testing to identify potential server-side bottlenecks and optimize server-side code as needed.
- Caching: Implement caching strategies at both the server and client levels. Server-side caching can reduce the load on your server, while client-side caching can speed up subsequent visits for users.
- Content Delivery Networks (CDNs): Consider using CDNs to distribute your assets and content globally. CDNs can improve the availability and load times of your SSR application for users worldwide.
- Error handling and monitoring: Implement robust error handling and monitoring mechanisms. Monitor server-side errors, client-side errors, and performance issues to proactively address issues as they arise.
Wrapping Up
In this post, we learned about server-side rendering and how to use SSR in Next.js, React, and TypeScript.
With SSR in your toolkit, you're well-equipped to create speedy and user-friendly web experiences.
Whether you're building your own web projects or diving deeper into web development, SSR is a valuable asset to have at your disposal.
Happy coding!
P.S. If you liked this post, subscribe to our JavaScript Sorcery list for a monthly deep dive into more magical JavaScript tips and tricks.
P.P.S. If you need an APM for your Node.js app, go and check out the AppSignal APM for Node.js.