
If a web application involves users, as a matter of course, their data should be protected and secured.
Securing a web application can mean several things. In this post, we'll discuss a subset of web security that involves authentication using JSON Web Tokens (JWTs) and the Ruby on Rails web application framework.
Let's get started!
What is a JSON Web Token?
A JSON Web Token is an internet standard defined by the Internet Engineering Task Force (IETF) as a: "compact, URL-safe means of representing claims to be transferred between two parties".
Here, "claims" refers to assorted pieces of information about a subject. A claim is represented as a name/value pair where the name is always a string, and the value can be any JSON value.
The Basic Structure of JSON Web Tokens
Delving into the intricacies of JWTs is out of the scope of this post. That said, it's worth knowing the structure of JWTs.
A JWT consists of three parts, separated by a period: the header, payload, and signature.
An example JWT could look like the following:
eyJhbGciOiJIUzI1NiIsInR5cCI6IkpXVCJ9.
eyJzdWIiOiIxMjM0NTY3ODkwIiwibmFtZSI6IkpvaG4gRG9lIiwiaWF0IjoxNTE2MjM5MDIyfQ.
SflKxwRJSMeKKF2QT4fwpMeJf36POk6yJV_adQssw5c
For the sake of readability, each part of the token starts on a new line. In practice, the parts are joined.
This token is sent from a server to a client. The client sends the token to the server to identify itself and have a request processed.
The first part, the header, contains information about the algorithm used to generate the token and the type of token. If decoded, we get something like:
{
  "alg": "HS256",
  "typ": "JWT"
}
The second part, the payload, contains a set of claims about the user. In most cases, this would be the client in a client-server setup, and it could look like:
{
  "sub": "1234567890",
  "name": "John Doe",
  "iat": 1516239022
}
The signature (the last part of a signed JWT) validates the token. It is generated by encoding the header and the payload using Base64url Encoding — RFC 4648 and then concatenating them with a period separator.
Essentially, what happens with the signature bit is this:
HMAC_SHA256(
  secret,
  base64urlEncoding(header) + '.' +
  base64urlEncoding(payload)
)
HMAC_SHA256 is a type of keyed hash algorithm constructed from the SHA-256 hash function that hashes the signature. The choice of the cryptographic algorithm comes from the "alg": "HS256" in the header. If the token is unsigned, it'll only have the header and payload without the signature.
JWTs Vs. Other Authentication Methods for Your Ruby App
JSON Web Tokens, as the name implies, are token-based. On the other end of the spectrum, we have session-based authentication: a more traditional way of authenticating users. The flow of session-based authentication is quite different from that of token-based authentication.
The flow of session-based authentication might look like the following:
- A user or client sends a request which contains user credentials.
- The server authenticates the user, stores a session, and returns a session ID stored as a cookie in the browser.
- The client sends the cookies along with its subsequent requests to the server.
- The server inspects the session information presented and, if valid, authenticates the user and returns the requested information to the client.
While session-based authentication is mostly used for client-server connections, token-based authentication is often used with server-server connections (e.g., between two APIs).
One important difference to note, however, is that with session-based authentication, the authentication state is handled on the server — while tokens are managed on the client.
Why Use JWTs for Authentication?
Aside from being relatively simple to implement, there are a few other advantages of using JSON Web Tokens for authentication, such as:
- They are stateless, meaning that a session store is not necessary. The token itself contains all of the user information, so there is no need to query a database or authentication server for information on each request.
- JWTs are generally more performant than most traditional methods of authentication (as long as the server doesn't do any lookups against a database or store to authenticate a user), making them quite efficient.
- They also offer solid security guarantees, in that signed JWTs provide safeguards so an attacker or client can't modify the tokens to gain access to protected data.
JWT Best Practices for Ruby Apps
It goes without saying that the secret keys used to sign JWTs should be long, random, and have complex character combinations. This ensures that the keys are adequately safe and it's hard for attackers to brute-force them.
The secret keys Rails generates are safe for the most part, but safety guarantees are nullified if you accidentally commit keys and reveal them.
It's also important to use Transport Layer Security (TLS) when transporting tokens between parties on a network. TLS can mitigate a man-in-the-middle attack (both token and session-based authentication methods are prone to such attacks).
Implementing JWT authentication in a Rails App
Let's take a look at a token-based authentication flow:
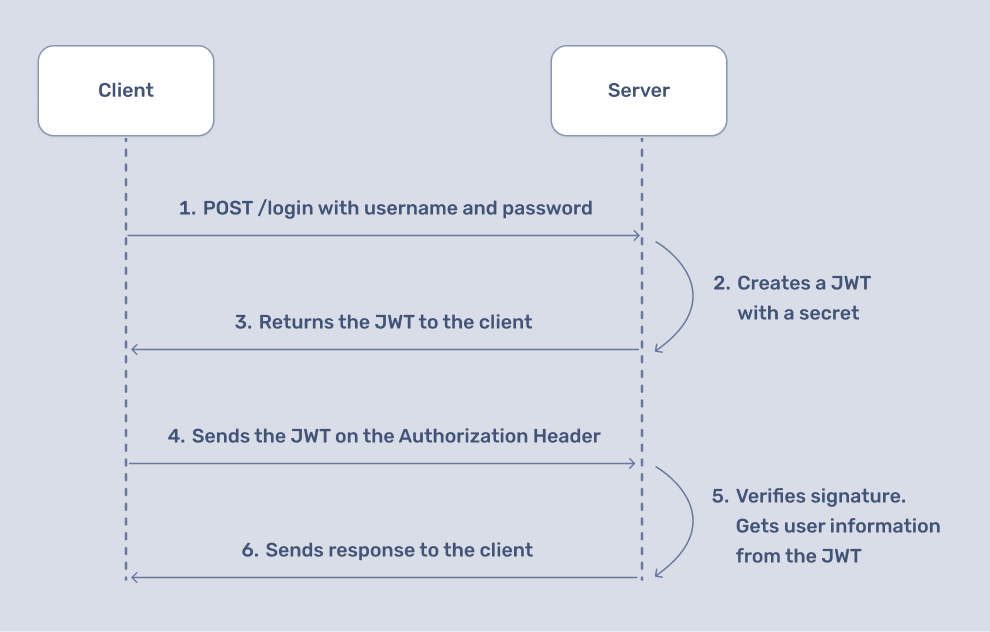
Unlike session-based authentication, a stateful authentication technique where we use sessions to keep track of an authenticated user, token-based authentication with JWTs is stateless; there's no need to store any information about a user's authentication state on the server. This simplifies application design.
In this post, we'll assume that our application is split into a frontend and a backend. Authentication occurs on the backend, so we will be building a Rails API backend with authentication.
The sample code in this post is based on Rails 7.0.5 and Ruby 3.2.2.
Using the jwt and bcrypt Ruby Gems
We'll need two gems for our application: jwt and bcrypt.
jwt is a Ruby implementation of the RFC 7519 OAuth JSON Web Token standard. bcrypt is a Ruby binding for the OpenBSD bcrypt() password hashing algorithm.
You can follow along with the sample code in this code repo.
Note: jwt is not the only solution for working with JWTs; another well-known gem is devise-jwt, which provides JWT authentication for Devise and Rails. But we'll focus on jwt in this post.
Let's get started.
Building our Rails API
The first thing we need is an API application. We'll create one with:
rails new jwt_rails_api --api
The --api option here preconfigures a smaller stack of Rails for API applications only.
Inside the Gemfile, we can add our first dependency, jwt. Our second gem, bcrypt, is already in the Gemfile of a newly-generated Rails application — we only need to uncomment it.
We need bcrypt to securely hash user passwords in the database. It's important to note that we won't use bcrypt directly. We'll leverage Active Model's has_secure_password class method, which depends on bcrypt.
Ignoring the default gems that come with a new Rails application, our Gemfile should look something like:
gem 'jwt', '~> 2.7'
gem "bcrypt", "~> 3.1.7"
Now is a good time to install our gems with bundle install.
Generate User and Product Models
Next, we'll generate two models: User and Product. User will be the model to represent users and we'll authenticate it to allow access to products, represented by the Product model.
rails g model User username:string password_digest:string
rails g model Product name:string description:text
After running our migration with rails db:migrate, our setup with models is complete, and our schema, found in db/schema.rb, should now look similar to this:
ActiveRecord::Schema[7.0].define(version: 2023_05_28_224534) do
  create_table "products", force: :cascade do |t|
    t.string "name"
    t.text "description"
    t.datetime "created_at", null: false
    t.datetime "updated_at", null: false
  end

  create_table "users", force: :cascade do |t|
    t.string "username"
    t.string "password_digest"
    t.datetime "created_at", null: false
    t.datetime "updated_at", null: false
  end
end
It's important to point out at this stage that we're deliberately ignoring potential issues such as database constraints, validations, ensuring uniqueness, etc. For the sake of this post, we'll disregard handling errors, among others. Our purpose here is to demonstrate JWTs in action as a form of stateless authentication to secure our Ruby application. In a production application, you'd want to make sure all of these are covered.
Build a jwt Gem Wrapper
The next step is to build a wrapper around the jwt gem we installed earlier. We'll use this wrapper to encode and decode claims from the server to the client. For this, we'll create an app/lib folder.
The reason we're not using the lib folder that comes with Rails is that it's not autoloaded. Everything under app is autoloaded and eager-loaded by default, making for a simpler setup in our case.
Our wrapper class is found in app/lib/json_web_token.rb and looks like this:
class JsonWebToken
  JWT_SECRET = Rails.application.secrets.secret_key_base

  def self.encode(payload, exp = 12.hours.from_now)
    payload[:exp] = exp.to_i

    JWT.encode(payload, JWT_SECRET)
  end

  def self.decode(token)
    body = JWT.decode(token, JWT_SECRET)[0]

    HashWithIndifferentAccess.new(body)
  end
end
The main methods here are encode — to encode user information — and decode — to later decode user information in the server. Note how we're delegating the encoding and decoding tasks to the jwt gem through JWT.encode and JWT.decode.
At this point, you can already test this class in your Rails console:
data = {"name"=>"AppSignal"}

JsonWebToken.encode(data)
# => "eyJhbGciOiJIUzI1NiJ9.eyJuYW1lIjoiQXBwU2lnbmFsIiwiZXhwIjoxNjg1NDI0MjI5fQ.zWJyFHH8Pa6phBOU99XgtRntyfZQSOTX4TdwOxFY9gY"

JsonWebToken.decode(JsonWebToken.encode(data))
# => {"name"=>"AppSignal", "exp"=>1685424262}
Notice how the result of JsonWebToken.encode(data) is split into three parts by a period, producing the header, payload, and signature. We have the signature bit because we signed our payload with a secret key that Rails provides through Rails.application.secrets.secret_key_base.
Back to the User Model
Now will be a good time to visit our User model at app/models/user.rb. All we need to do here is add the has_secure_password class method:
class User < ApplicationRecord
  has_secure_password
end
has_secure_password securely hashes our users' passwords in the database.
Create a Sample User and Product in Rails
Now we can hop into the Rails console to generate a sample user and product in our database and test the security of our application:
User.create(username: "emi", password: "password")
Product.create(name: "Rad Ruby", description: "A book collection of Ruby tips")
You can place the same piece of code in your seeds.rb file to save some typing in case you reset your database.
Using JWTs in Rails Controllers
In the next steps, we'll implement security using JWTs inside our controllers. A good place to start is the ApplicationController at app/controllers/application_controller.rb:
class ApplicationController < ActionController::API
  before_action :authenticate

  rescue_from JWT::VerificationError, with: :invalid_token
  rescue_from JWT::DecodeError, with: :decode_error

  private

  def authenticate
    authorization_header = request.headers['Authorization']
    token = authorization_header.split(" ").last if authorization_header
    decoded_token = JsonWebToken.decode(token)

    User.find(decoded_token[:user_id])
  end

  def invalid_token
    render json: { invalid_token: 'invalid token' }
  end

  def decode_error
    render json: { decode_error: 'decode error' }
  end
end
Here, we create an authenticate method to decode JSON Web tokens that users send us. If we can successfully verify the token, we return the User object that represents the user making the request. We're mostly interested in the happy path here and will bypass a lot of checks.
Defining the authenticate method in the ApplicationController and setting it up as a before_action secures every controller inheriting from it. A request to any other controller will need a valid JWT to access those controllers (because every other controller will inherit this main controller).
Next, we need an AuthenticationController to which users can send requests and get a signed JSON Web Token from our server. This controller should be placed at app/controllers/authentication_controller.rb and may look like this:
class AuthenticationController < ApplicationController
  skip_before_action :authenticate

  def login
    user = User.find_by(username: params[:username])
    authenticated_user = user&.authenticate(params[:password])

    if authenticated_user
      token = JsonWebToken.encode(user_id: user.id)
      expires_at = JsonWebToken.decode(token)[:exp]

      render json: { token:, expires_at: }, status: :ok
    else
      render json: { error: 'unauthorized' }, status: :unauthorized
    end
  end
end
When a request hits this controller, because it's a user asking for a token, we don't want to initially authenticate them. The purpose of this controller is to respond with a token the user can use to access the rest of the resources on our server. Hence the need for skip_before_action :authenticate on the second line.
In the login action (the one that users hit for a token), we grab the username and password from the parameters that come with the request to this controller. If we can authenticate the user — that is, verify if their username and password match what we have stored in our database — then we present them with a signed token and information about when that token expires.
In our case, we won't use the expiry period of the token. But in a production application, that could be used to revoke access to a resource.
We'll go through all these steps using curl later on.
Testing Our Ruby Application with a Protected Resource
We partly covered the flow in the earlier 'Implementing JWT authentication in a Rails App' section's flow diagram. To completely cover everything and test out all the steps in the flow diagram, we need a resource to protect.
We have a Product model already. We now need a controller for the product model and routes to access the product and tokens.
Let's create a controller with rails g controller Product index so we have something like:
class ProductsController < ApplicationController
  before_action :authenticate

  def index
    @products = Product.all

    render json: @products
  end
end
Of course, we need a route to access these controllers. Our config/routes.rb should look something like:
Rails.application.routes.draw do
  post 'login', to: "authentication#login"
  get 'products', to: "products#index"
end
Now we'll test with curl to see if everything works as expected. Note that we already have a user to authenticate and a product resource to access.
Let's try getting a JWT with a user that doesn't exist:
curl -H "Content-Type: application/json" -X POST -d '{"username":"manny","password":"password"}' http://localhost:3000/login
We should get the following response:
{"error":"unauthorized"}
Now try the same with a user that we created earlier:
curl -H "Content-Type: application/json" -X POST -d '{"username":"emi","password":"password"}' http://localhost:3000/login
This should give us a signed JSON web token that could look like this:
{"token":"eyJhbGciOiJIUzI1NiJ9.eyJ1c2VyX2lkIjoxLCJleHAiOjE2ODU0NTEyMTR9.1UEYAbmFOSF93yp9pJqNEzkdHr3rVqutPNZWRIPDYkY","expires_at":1685432077}
Let's keep this token for a second and try accessing a product resource with a bad token (I changed a random character in the token):
curl -H "Authorization: Bearer eyJhbGciOiJIUzI1NiJ9.eyJ1c2VyX2lkIjoxLCJleHAiOjE2ODU0NTEyMTR9.1UEYAbmFOSF93yp9pJqNEzkdHr3rVqutPNZWRIPZYkY" http://localhost:3000/products
And we should get:
{"decode_error":"decode error"}
However, if we make the same request to access the product resource with the valid token we got from the server previously:
curl -H "Authorization: Bearer eyJhbGciOiJIUzI1NiJ9.eyJ1c2VyX2lkIjoxLCJleHAiOjE2ODU0NTEyMTR9.1UEYAbmFOSF93yp9pJqNEzkdHr3rVqutPNZWRIPDYkY" http://localhost:3000/products
We're granted access to the product resource:
[{"id":1,"name":"Rad Ruby","description":"A book collection of Ruby tips","created_at":"2023-05-29T19:33:30.826Z","updated_at":"2023-05-29T19:33:30.826Z"}]
That's it! We've successfully secured our Ruby application with a JSON web token!
Wrapping Up
In this post, we discussed JSON Web Tokens and how they work. We first covered the basics of JWTs, including their structure and some best practices. Then we implemented a simple JWT authentication using the jwt gem.
I hope you've found this post helpful. Happy coding!
P.S. If you'd like to read Ruby Magic posts as soon as they get off the press, subscribe to our Ruby Magic newsletter and never miss a single post!