
Test coverage plays a key role in providing bug-free experiences to users. At the same time, writing and maintaining test scripts for different web browsers is cumbersome and time-consuming. Fortunately, there is a solution!
Playwright is a cutting-edge tool that makes it easy to automate modern web browsers. Through its powerful API, you can write end-to-end test scripts that run smoothly on different browsers.
In this article, we'll cover:
- What Playwright is and what makes it a cool technology
- Its main pros and cons
- How to get started with it in a step-by-step tutorial
Let's dive straight in!
What Is Playwright for Node?
Playwright is an open-source framework that provides a high-level API for web testing and automation. It's a Node.js library hosted on GitHub and developed by Microsoft in JavaScript. The tool aims to overcome the limitations of Selenium and Puppeteer by offering a reliable and fast API.
The Playwright API allows you to build web automation scripts that work on the most popular browsers, including Chrome, Firefox, Edge, and Safari. It natively supports JavaScript and TypeScript, but it's also available for Python, Java, and .NET. You can run it on macOS, Windows, or Linux, locally or on CI, in a headless or headed browser, in desktop or mobile mode. This makes it an extremely flexible tool.
Its capabilities aren't limited to functional or end-to-end testing. Playwright also comes in handy for API testing, web scraping, and bot automation. Thanks to Playwright, you can instruct browsers to navigate to URLs and perform specific actions on a web page as human users would.
In short, it's a cross-platform and cross-browser JavaScript-based framework that makes it easier to control browsers for automated tasks.
Playwright: Pros and Cons
Let's dig into Playwright's main benefits and drawbacks.
Pros
- Multi-browser support: Playwright supports the Chromium, Firefox, and WebKit browser rendering engines. This means it works on all major web browsers. Plus, you can configure it to run the same script on multiple browsers simultaneously. It also offers multi-tab and multi-window support on both desktop and simulated mobile instances of each browser.
- Multi-programming language support: The technology is available in several programming languages. These include JavaScript, Python, Java, and C#. They all share the same basic implementation, meaning that all core features are supported in each language. This allows you to build browser automation scripts in the language you're more familiar with.
- Built-in reporting capabilities: Playwright is equipped with advanced HTML reporting functionality. After running a script on one or more browser instances, it provides a detailed HTML document containing your test results. These reports can include screenshots, videos, and text logs, making it easier to understand what has happened and how to debug issues.
Cons
- Support for web technologies only: Playwright is specifically designed for web browsers. As a result, you can only use it with applications that run in a browser. Any software developed with non-web technologies is out of its scope. For example, mobile or desktop apps aren't supported.
- No support for IE11: Playwright does not support Internet Explorer 11. Even though IE was deprecated on June 15 2022, some companies still use it for their legacy web applications.
- Still a small community: Playwright's first commit was in 2020, which makes it a relatively new technology. It recently reached a milestone of 1 million weekly downloads, but its community is still growing. This makes finding answers to specific problems somewhat difficult, especially compared to more mature solutions like Selenium.
Get Started with Playwright for Node.js
In this step-by-step section, we'll guide you through the process of setting up a Playwright project, writing your first test, launching it, and examining the results.
Prerequisites
Before diving in, make sure you meet the following prerequisites:
- Node.js v18+ installed on your PC
- Basic knowledge of TypeScript
Set Up a Playwright Project
To create a Playwright project, run the command below in your terminal:
npm init playwright@latest
If this is the first time you've launched it on your machine, you’ll be asked the following question:
Need to install the following packages:
  create-playwright@1.17.127
Ok to proceed? (y)
Type “y” and press Enter to continue.
The create-playwright npm library will be installed, and the initialization task will continue as expected.
You'll be asked some other questions. When in doubt, press Enter to select the predefined answer. Here's what a default configuration looks like:
√ Do you want to use TypeScript or JavaScript? · TypeScript
√ Where to put your end-to-end tests? · tests
√ Add a GitHub Actions workflow? (y/N) · false
√ Install Playwright browsers (can be done manually via 'npx playwright install')? (Y/n) · true
After you answer all these questions, the npm init playwright@latest command will launch npm init -y and initialize an npm project.
Then, it will start downloading the browsers as specified in the answer to the last question. This may take a few minutes, so be patient.
At the end of the process, you'll have a Playwright project. In addition to the files required by npm, this consists of:
tests/: A folder that contains a basic example test.tests-examples/: A folder with more complex sample tests to help you understand how the technology works.playwright.config.ts: The Playwright configuration file where you can customize several options, including selecting which browsers to run your scripts on.
Great! You're now ready to devise your first test script!
Write Your First Test
In Playwright, test scripts are stored in .spec.ts files under the tests folder.
By default, the initialization command generates a sample example.spec.ts script for you.
You can take a look at it to get familiar with the technology.
Playwright tests are pretty simple. They perform actions and assert the state against some expected values.
Now, suppose you want to write a test that visits the AppSignal homepage, extracts the page title, and verifies that it contains the expected string.
To achieve that, open the example.spec.ts file, delete the existing test code, and replace it with this snippet:
import { test, expect } from "@playwright/test";

// define a test task called "has expected title"
test("has expected title", async ({ page }) => {
  // visit the AppSignal home page in the browser
  await page.goto("https://appsignal.com/");

  // retrieve the page title
  const title = await page.title();

  // expect the page title to be equal to the expected string
  await expect(title).toBe(
    "Application Monitoring for Ruby on Rails, Elixir & Node.js | AppSignal APM"
  );
});
The test() function takes a title and a callback.
The title represents the test task name and will be used in the logs and HTML report.
The callback is where you have to implement the test logic.
It gives you access to the page variable.
That's a special Playwright object that exposes methods to interact with the page in the browser.
For example, the title() function returns the page title as a string.
Note that a single .spec.ts file can include several test() functions.
Each of them is isolated and will be executed in separate worker processes, so they don't share a state or global variable. Inside test(), you can test assertions against the expected results with the expect() function.
If the condition specified in the assertion is met, the test continues.
Otherwise, it gets aborted with a negative result.
Most tests begin with the page.goto() instruction navigating to the target page.
After that, you can interact with the elements in the DOM to change the page state or retrieve some data.
Lastly, make an assertion to verify the expectation by using one of the many matcher functions. The most common matchers are toEqual(), toContain(), and toBeTruthy().
These methods can assert any conditions and allow you to build resilient scripts.
Run Your Playwright Test
By default, Playwright is configured to run all tests in headless mode simultaneously on Chromium, Firefox, and WebKit using three different workers.
You can change that behavior in playwright.config.
Run your test with:
npx playwright test example.spec.ts
Note that the test command accepts several flags. The most important ones are:
--ui: To run the test in UI Mode with time travel debugging, watch mode, and other quality-of-life features for developers.--headed: To open the browser in headed mode when running the test.--debug: To run the test in the debugger of your IDE, if configured.
If you wanted to run all .spec.ts scripts with a single command, you could use:
npx playwright test
Behind the scenes, Playwright has to open various browser instances. This is a resource-heavy task and may take some time. Once finished, the automation tool will automatically create an HTML report containing all test results.
Analyze the HTML Test Report Results
If you want to manually open the last generated HTML report, launch:
npx playwright show-report
You can also find it in the playwright-report folder.
This is what an HTML test report looks like:
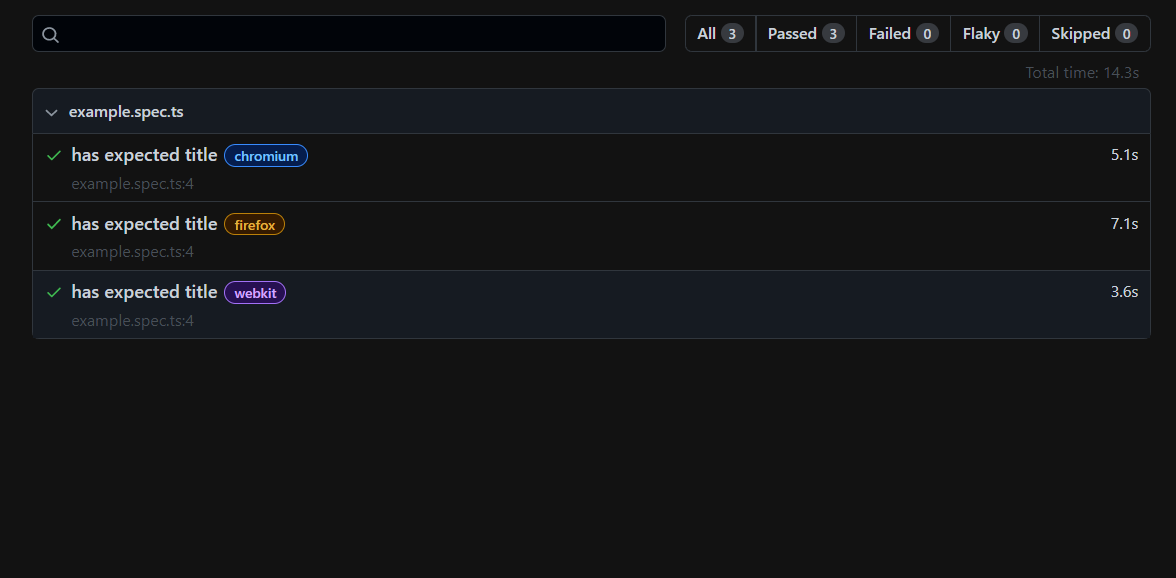
As you can see, it allows you to filter the results by browsers and by passed, failed, skipped, and flaky tests.
If you click on a test card, you'll get access to detailed information.
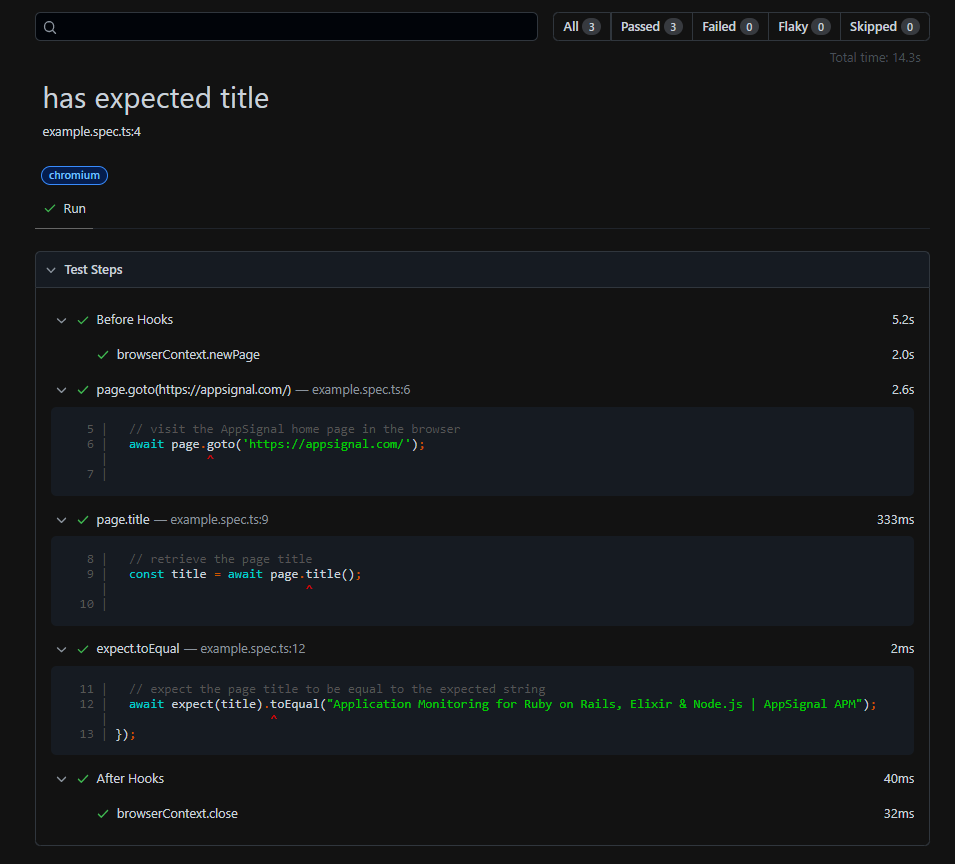
This includes the test status, steps, duration, eventual logs, screenshots, and videos.
Et voilà! Automating web browsers has never been easier!
Wrapping Up: End-to-End Testing Made Easy with Playwright
In this blog post, we introduced you to Playwright. You now know:
- What Playwright is
- Its benefits and drawbacks
- How to get started with it
Thanks for reading!
P.S. If you liked this post, subscribe to our JavaScript Sorcery list for a monthly deep dive into more magical JavaScript tips and tricks.
P.P.S. If you need an APM for your Node.js app, go and check out the AppSignal APM for Node.js.